Here are some questions you may have.
Frequently Asked Questions
What is PRISM Live Studio?
PRISM Live Studio is a service that allows you to record and edit diverse
live streams, videos, and photos with a variety of
effects.
Add various media files such as fun stickers, videos, images, and music to
easily create your own special videos.
What can I do with PRISM Live Studio?
You can use PRISM Live Studio to create live broadcasts, record videos, and
take photos.
After launching the app, then tap either the CONNECT, LIVE, VIDEO, and PHOTO
buttons at the bottom.
You can freely change to your desired filming mode.
Live Broadcasting Mode
Which live streaming platforms are supported by PRISM Live Studio?
Using PRISM Live Studio, you can conduct live broadcasts on various
platforms such as YouTube, Facebook, CHZZK, NAVER Shopping Live, BAND, NAVER
TV, SOOP, Twitch, and various RTMP URLs.
If you need more information about streaming with platform account login, go to the help page about connecting to
streaming platforms. In addition, if you want to know how to stream live
RTMP keys, go to the help page about
setting up RTMP.
I'd like to connect to streaming platforms like YouTube or Twitch.
-
Connect to streaming platforms.
-
1. Tap the Ready button on the broadcast preparation screen.
-
2. Move to the platform selection screen.
-
3. Choose the platform you wish to connect.
• Once you log in to the platform, the streaming platform will be connected automatically.
• After the initial login, you will be able to continually broadcast through the connected platform.
• To add more platforms, before the Go live stage, select the [My Channel] button > Go to the platform addition screen > Select the [+] button > Move to the platform selection screen and add the platform.
-
-
Disconnect from streaming platforms.
-
1. Select [My Channel] > Choose the platform from the list of added platforms > Select the disconnect button next to the [Platform Name].
-
2. On the broadcast preparation screen, select the user profile in the upper right corner > Choose the gear icon on the right of the username > Settings > Select Live Service Accounts > Click the Disconnect button next to the platform name.
-
How do I set up a RTMP server to stream live videos?
-
1. Select the Ready button on the broadcast preparation screen.
-
2. Move to the platform selection screen.
-
3. Choose the platform you want.
-
4. Select the RTMP manual input button at the bottom of the screen for the chosen platform or choose Custom RTMP.
-
5. If you choose Custom RTMP, select the angle bracket to the right of the Stream URL to select one of the preset lists of popular streaming platforms. Choose the desired RTMP address.
Note: NAVER Shopping Live does not support RTMP.
Where can I find the stream key of the RTMP server?
-
In order to broadcast to an RTMP server, you must enter the stream keys that can be found on each platform into PRISM Live Studio.
-
1. Checking the stream key on YouTube
* It is recommended you check the following on a PC.
- • Visit the page below to find the stream key on YouTube.
- • Log in to the YouTube account you wish to broadcast to.
- • Find the [Stream name/key] available under [Encoder Setup] on the Live Dashboard.
- • Enter the stream key into the RTMP setup page of PRISM Live Studio and start broadcasting.
-
2. Checking the stream key on Facebook
* The following is only available on PC.
- • Visit the page below to find the stream key on Facebook.
- • Log in to the Facebook account you wish to broadcast to.
- • Click on the [Live Video] option in the status section.
- • Go to the [Connect] tab and copy the codes shown under [Stream Key].
- • Enter the stream key into the RTMP setup page of PRISM Live Studio and start broadcasting.
-
3. Checking the stream key on Twitch
* It is recommended you check the following on a PC.
- • Log in with the Twitch account you wish to broadcast to.
- • Visit the URL below to find the stream key on Twitch.
- • Log in to the Twitch account you wish to broadcast to.
- • Go to [Settings > Channel] available at the bottom-left menu.
- • Click on [Stream Key], then click on the [Show Key] button and copy the key.
- • Enter the stream key into the RTMP setup page of PRISM Live Studio and start broadcasting.
-
4. Checking the stream key on BAND
* It is recommended to check the key on a PC.
- • Visit the page below to find the stream key on BAND.
- • Log in to the BAND account you wish to broadcast to.
- • Go to the [Live stream] menu to get and copy the stream URL and key.
- • Enter the stream key into the RTMP setup page of PRISM Live Studio and start broadcasting.
-
5. Checking the stream key on NAVER TV
* It is recommended you check the following on a PC.
- • Visit the page below to find the stream key on NAVER TV.
- • Log in to the NAVER account you wish to broadcast to. (Please note that only accounts that own a NAVER TV Channel can check the stream key.)
- • Go to the broadcast list and check the codes in the [Stream Settings], available at the right of the Start/Edit page.
- • Enter the stream key into the RTMP setup page of PRISM Live Studio and start broadcasting.
-
6. Checking the stream key on SOOP
* It is recommended you check the following on a PC.
- • Visit the URL below to find the stream key on SOOP.
- • Log in to the SOOP account you wish to broadcast to.
- • Go to the [Encoder Settings], available at the bottom of the [Dashboard], and check the [Stream Name].
- • Enter the stream key into the RTMP setup page of PRISM Live Studio and start broadcasting.
-
7. Checking the stream key on kakaoTV
* It is recommended you check the following on a PC.
- • Visit the URL below to find the stream key on kakaoTV.
- • Log in to the kakaoTV account you wish to broadcast to.
- • Go to the [Stream Settings], and click the [Stream key] button.
- • Enter the stream key into the RTMP setup page of PRISM Live Studio and start broadcasting.
Can I broadcast on multiple platforms simultaneously?
You can simultaneously broadcast to a maximum of 6 channels at once.
Preparing for Multistreaming
-
1. Go to the screen where you select channels.
Refer to the Broadcasting Platform Integration Guide for guidance to find this screen. -
2. Turn on the switch to the right of the platform name in the My Channels list.
-
3. When you turn on the switches for 2 or more platforms, the multistreaming icon will turn on, automatically switching to multistreaming mode.
-
4. NAVER Shopping Live does not support multistreaming.
Select the X button at the bottom of the screen to move to the broadcast preparation screen. -
5. Choose the Go Live button to start multistreaming.
How do I change the encoding settings?
You can set the desired quality of a live video according to the network and device performance. Select the button that indicates resolution on the broadcast preparation screen, and the encoding setting layer will be visible. Please note that you cannot change the settings once the broadcast starts.
In the encoding settings layer, you can change option values as follows.
-
1) Adaptive Bitrate
: This is a feature that analyzes the network in real-time during a broadcast to automatically find and adjust to the optimal Bitrate and FPS. If you set it to 'On', the image quality may be reduced although it enables a stable live broadcast. Thus, you can set it to 'Off' if you would like to keep the image quality although buffering may occur during the broadcast. -
2) Resolution
: Resolution refers to clarity (or image quality) of an image. If you broadcast for a long time with high resolution, heating may occur. So, consider the broadcast content before setting. In order to maintain a stable broadcast quality, the use of some effects may be limited when the resolution is set at 1080p. Please note that some platforms may not support 1080p (e.g. Facebook). -
3) Bitrate
: Bitrate refers to the amount of data sent per second. The higher the Bitrate is, the higher the broadcast image quality becomes; however, as it makes the image size larger, the broadcast may not be smooth if the network is not good.
: We recommend using Bitrate by resolution as follows.
360p (1~2Mbps), 720p (2~4Mbps), 1080p(4~6Mbps) -
4) Frame Rate
: Frame rate refers to the number of frames (images) composing a video in one second. The higher the number of frames you set, the smoother the motion and more natural the broadcast becomes.
: In normal live broadcasting, we recommend using 30fps -
5) Keyframe Interval
: Keyframe Interval refers to the cycle (seconds) when I-Frame (mainframe that composes a video) is inserted, among the frames that compose an image.
: In normal live broadcasting, we recommend using 1-2 seconds.
I want to flip the camera horizontally.
Press the [See more] button at the top left of the filming screen, and a
menu will be shown that allows you to turn on/off the option
to flip camera image horizontally.
It can only be applied when using
the front-facing camera, and the camera image cannot be
flipped when using the rear camera.
What modes are provided when swiping left or right?
Switching modes is available while you stream live or you are in the broadcast preparation screen.
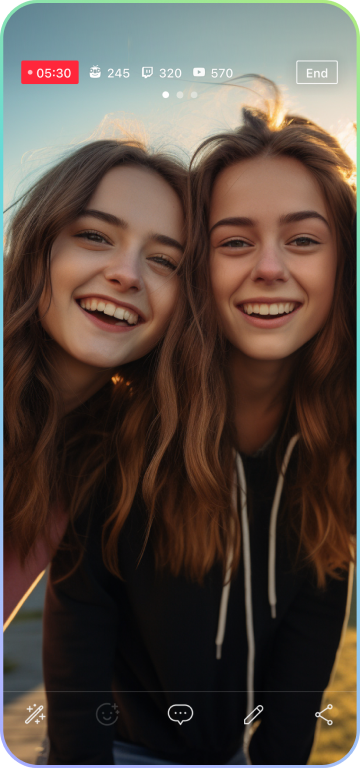
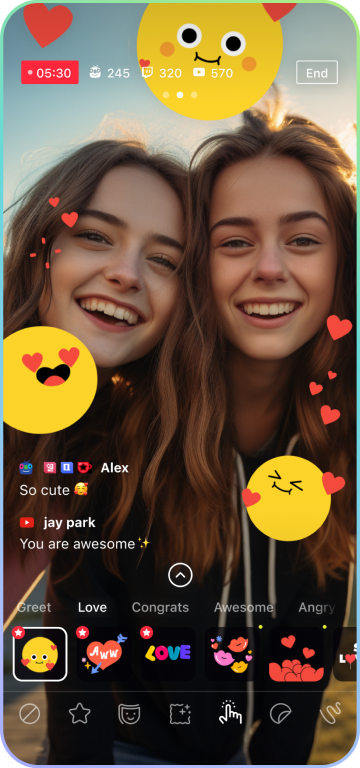
-
1) Switch to Video only mode
Swipe right to go to Video only mode and the live chat and the broadcast preparation window disappear.
In Video only mode, you can concentrate on the live video and easily change the scale or position of sources. -
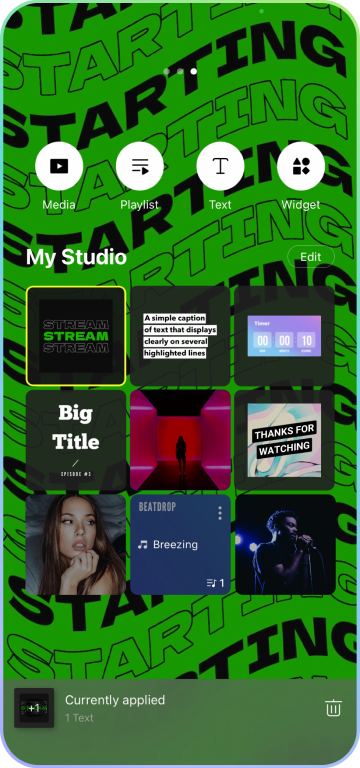
2) Switch to My Studio
Swipe left to go to My Studio.
In My Studio, you can manage media files you want to add to your live.
For more information about My Studio, go to the help page about My Studio.
Can I link donation services like Twip to My Studio to broadcast a live stream?
Try the webpage source function in My Studio. For iPhone users, this function is available only on iOS 11 or higher. Please note that videos and sounds from some webpages may not play normal due to technical constraints.
-
1) Adding a webpage
Press [Web] in My Studio. Copy and paste the URL of the widgets, then press [Save].
-
2) Selecting a source from My Studio
Select the webpage you wish to add from the list of sources in My Studio. Adjust the position and size of the webpage.
-
3) Layer lock settings
Switching the layer lock settings to on enables the webpage source to remain unmoved even if touched, making it convenient when streaming gameplay. To switch the layer lock settings to off, go to My Studio and press the more button.
-
4) Editing a webpage size
After inserting a web source on the screen, use the +/- button to zoom in or out its content.
I want to share my mobile screen with viewers.
-
Using Screencast (broadcasting your mobile screen)
-
1. Tap [Screen] on the broadcast preparation screen.
-
2. Make sure to allow all of the necessary permissions required to use Screencast (app displayed on top of other apps and taking screenshots of all screens). - You will be asked for the permissions when you open the app for the first time. You can also allow them before going live.
-
3. Select the [Ready] button.
-
4. After Screencast has started, there will be a 3-second countdown for you to transmit your screen.
-
5. Move to your device's home screen while staying live.
-
6. Start the game or app you wish to share.
-
7. Check if the desired screen appears on the service screen of the platform you wish to broadcast to.
-
-
You can use the Screencast broadcast control panel at the top of the mobile device screen while using Screencast on Android.
-
1. Select the round PRISM icon on the mobile device screen.
-
2. In the Screencast broadcast control panel, you can chat, adjust the sound and microphone volume, and protect the transmission screen (a feature similar to a screensaver).
-
What is an intro and how do I set it up?
Intro is a feature that automatically plays video clips and images before your broadcast begins.
-
- Make an intro using images and video clips
-
1. Tap [Intro] (icon image) below the platform profile in the broadcast preparation screen.
a. Select the video and image assets in My Studio.
b. You can make an intro with the sources saved in My Studio. -
2. Make sure that you import sources to My Studio before making an intro.
-
3. Change the video size using the zoom in/out feature located in the lower left of the screen.
Use the bar at the bottom to set the beginning or end of your intro. The adjusted duration of the video is applicable only within the intro. - You can set the duration of an intro in the lower right of the screen. -
4. Tap [Done] to complete the process.
-
- Check the intro
-
1. Check the intro source thumbnail that has been set in the intro button area.
-
2. Selecting the area will allow you to edit or disable the intro.
Is there a chat feature available?
Chat feature is available when streaming to the platform connected via
account login.
If you wish to share chat messages with viewers, you can
use the [Comment Pick] feature.
If you press and hold on the message
desired, the message will be fixed on the broadcast screen.
Can I block chats for specific viewers?
Chatting for specific viewers can be blocked via the PRISM Live Studio chat window. Press and hold the comment of the viewer you wish to block, and the related menu will be displayed. Viewer chats can be deleted or blocked by pressing the [Report] button for NAVER TV, and the [Block] button for YouTube.
I'd like to promote my live videos using SNS.
You can share the URLs of your live videos to Facebook and X for certain platforms.
How can I screen a scene from streaming during a broadcast?
- During a broadcast, you can turn off your microphone or camera.
You can access these features by tapping the … button in the upper left of the screen. - Try using it if you encounter an unexpected situation during a live broadcast.
I want to record a live stream.
Recording camera and VTuber live streams does not require additional
settings.
Go to See More in the upper left of the screen > Select [Save video after
streaming] to download the recorded video to your device.
How can I get PRISM watermark removed?
Watermark removal is available as a Plus feature. Subscribe to Plus to enable the watermark removal option in the PRISM app under [Settings] > [Live Settings]
Ending your broadcast.
Once you start live broadcasting, an 'End' button will be exposed on the upper right side of the screen on your application. Clicking this 'End' button will end your live stream.
When you click the 'End' button, you will see a
progress bar for a few seconds with a message saying 'Ending broadcast'.
If you click the 'Cancel' button at the bottom of the screen before the
progress bar is completed, you can resume your live stream.
Even if the live broadcast appears to have ended on the content viewing platform during live streaming, the PRISM app may continue to be transmitting according to the RTMP policy of individual platforms.Therefore, in order to safely end the live broadcast, make sure you click the 'End' button.
My Studio and effects
What features are available in My Studio?
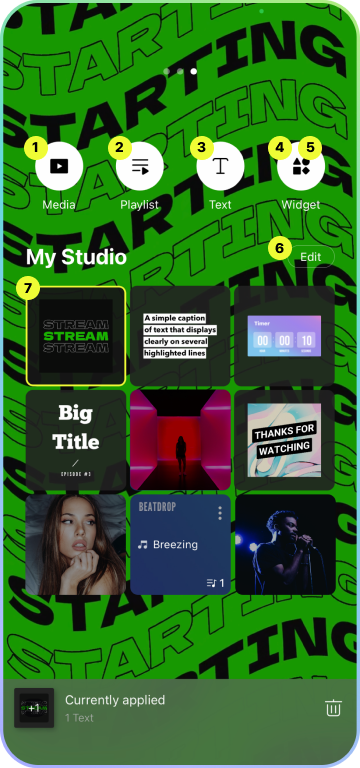
My Studio features the ability to add media, music, texts, webpages, chat widget sources to your collection of assets and easily apply them to your videos.
-
1. Add Media Source
This feature allows you to import images and videos from your mobile device’s gallery, and add them to My Studio assets.
-
2. Add Music Source
This feature allows you to import songs from your mobile device’s music library and/or unique tracks provided exclusively by PRISM Live Studio, and add them to My Studio assets.
-
3. Add Text Source
This feature allows you to create text sources, and add them onto the screen whenever needed. Various motion templates designed by PRISM Live Studio are available for different use cases such as notices, titles, and or SNS account information. Once a text source is created within My Studio, it will keep its position and size as it was.
-
4. Add Webpage Source
This feature allows you to enter the web address of webpages and/or donation services, and add them to My Studio assets. Once you add a webpage to the screen, you can resize the source by dragging the edges while you can zoom in or out its content by pressing the +/- button. For reliable broadcasting quality, the maximum number of web sources may be limited.
-
5. Add PRISM Chat Widget Source
This feature allows you to add a chat widget, which compiles messages from viewers and displays them on the viewing screen, and add them to My Studio assets.
You can select to either display on both viewers' and streamer's screens, or only on streamer's screen.
You can also change the chat widget’s color, font, style, and more. Once you add a chat widget to the screen, you can resize by dragging the edges and change the font size by pressing the +/- button.
-
6. Edit sources in My Studio
You can delete or change the order of the sources saved in My Studio.
-
7. Source collection in My Studio
An area where imported images, videos, and music sources are saved.
Tap the source to apply to the video easily.
I'd like to delete or move sources in My Studio.
Try using the edit feature in My Studio.
Click the [Edit] button in My
Studio
-
- Delete sources
-
1. Select the sources you want to delete, and tap the “Delete” button in the upper right of the screen.
-
2. The sources will be deleted from My Studio as well as videos applied with them.
-
- Change the order to sources
-
1. Tap and hold the sources you want to change order of.
-
2. Frequently used sources can be placed on top for quick application.
Can I use music sources provided by PRISM Live Studio for free?
Music sources provided in My Studio > Music are tracks by top creators
carefully selected through Premiumbeat and contests.
They can be used at
your disposal within PRISM Live Studio.
Enjoy a variety of tracks to fit
any mood such as Playful, Sentimental, Action, Beatdrop and Retro.
What effects can be used in PRISM Live Studio?
Tap the magic wand button  to show
various effects below.
to show
various effects below.
-
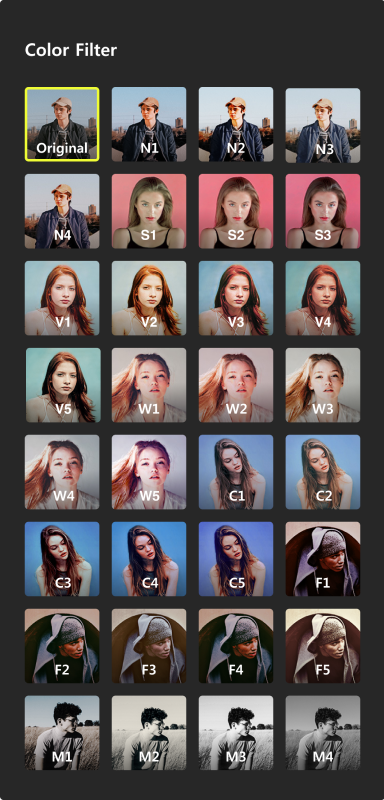
1) Color filter

This allows you to change the overall scheme of colors.
You are still allowed to use other effects with color filters on. -
2) Mask effect

This recognizes your face and provides mask effects following your facial movement.
-
3) Background effect

This helps you create a unique atmosphere by providing video frames and movie filters.
-
4) Emotion effect

This creates a quick, creative, and fun storyline for the audience. Choose an emotion that best expresses your feelings and enjoy the various emotion effect options available to you.
-
5) Drawing effect

This allows you to draw on the screen with various colors and pens.
-
6) Favorites

This allows you to quickly find your favorite effects by saving them in one place. You can add an effect as a favorite by holding the item, and a second-holding will allow you to delete an existing favorite effect. You can also use the edit function to reorganize your favorite effects list.
-
7) Giphy Stickers

This allows you to utilize Giphy stickers on PRISM. Click the Giphy sticker menu, type in a search word, and use the various available Giphy stickers. After a Giphy sticker is added to the screen, you can edit its position and size. For reliable broadcasting quality, the total number of Giphy stickers used at once may be limited.
Inquiries about AI Live Insights and AI Clip generation
What are AI Live Insights and AI Clip generation?
When a live broadcast you ran with PRISM Live Studio ends, AI analyzes the broadcast video and viewer reactions for you.
- - AI Live Insights: analyzes the key moments, viewer reactions, revenue performance, and more, and shows them at a glance. You can also check the broadcast script.
- - AI Clip generation: AI automatically finds the moments that drew the best reactions and turns them into short clips.
Where do I start the AI features?
You can start from either of the following:
-
1. Broadcast End screen — When you end a live broadcast, the [AI Live Insights] and [Create AI Clip] buttons appear on the screen.
2. MY > Broadcast History — Even after leaving the Broadcast End screen, the [Create AI Live Insights] and [Create AI Clip] buttons are available under Broadcast History in the MY menu.
-
- ※ For broadcasts that have already been processed, a [View] button appears instead of [Create]. Tap it to go to the results screen.
- ※ If you don’t see the [Create] button
AI features use the broadcast video saved on your device. If you broadcast with video saving turned off, or if the video was not saved or has been deleted, the [Create] button will not appear. AI Live Insights and AI Clips can only be created for broadcasts with a saved video.
Which broadcasts can I use the AI features with?
You can use them with broadcasts that meet all of the conditions below.
-
- - Turn on the option to save the live video in the app's settings before you start broadcasting. This lets you save the video to your device (photo library) from the broadcast end screen. If you delete the saved original video, AI generation is not available.
- - AI Live Insights can be created for broadcasts of 5 minutes or longer and up to 5 hours.
- - AI Clips can be created if the original video is 5 minutes or longer.
- - AI Clips can only analyze up to 5 hours of the original video. If it's longer than 5 hours, you can set a range yourself to create a clip.
- - AI generation is available only within 30 days from when the live broadcast ended.
- * If you leave without saving the video when the broadcast ends, you cannot create AI Live Insights or AI Clips for that broadcast.
How many credits do I need?
-
- - PRISM Credits are used for AI Live Insights and AI Clip generation. You can check the required credits next to the [Generate] button on each preparation screen.
- - You can check your credit balance from the credit icon at the top of the screen; tapping the icon takes you to the My Credits screen.
- - If you don't have enough credits, a guide for topping up credits appears.
- * Credit consumption may change as features are added or improved.
Can I close the app while generation is in progress?
On Android, generation continues even if you close the app or lock your device.
On iOS, generation may stop or pause if you close the app or lock your device, depending on the stage of the process.
-
- Generation proceeds in the following order: [Collect Stream Data → Upload Stream → AI Analysis → Generate]. The estimated time remaining is displayed on the screen.
- If the network connection is temporarily interrupted during upload, the upload will automatically retry and your progress will be preserved.
- You’ll receive a push notification when generation is complete or fails. Tap the completion notification to go to the results screen.
-
- ※ On Android, if a stage needs to be restarted after you close the app, tap the notification to return to the app and continue.
- ※ On iOS, generation may stop if you close the app during a stage that is processed on your device. If you lock your device, the process pauses and resumes when you unlock it. During server-side processing, generation continues even if you close the app or lock your device.
If I cancel generation, can I get the credits back?
- - If you tap [Cancel] during generation, the process will be reset and the credits used will not be refunded.
- - If generation fails due to a server or analysis error, the credits used will be automatically refunded within a few minutes.
- - If generation is interrupted because the app is force-closed, the credits will also be automatically refunded within a few minutes.
The [Generate] or [View] button doesn't appear in my broadcast history.
The buttons in MY > Broadcast history differ depending on whether AI generation has been done.
-
-
Before generation: the [Generate] button
- It appears for up to 30 days from when the live broadcast ended. After 30 days the button no longer appears and you cannot generate anew.
- The same policy applies to Custom RTMP broadcasts.
-
Before generation: the [Generate] button
-
-
After generation: the [View] button
- AI Live Insights results are kept on the server, so you can check them with the [View AI Live Insights] button with no time limit. The button still appears even if you delete and reinstall the app.
- The [View AI Clip] button appears only if the clip you generated is saved in your device's photo library. If you delete the app, the clip link information is deleted as well and the button no longer appears; the saved clip itself can still be found in your device's photo library.
-
After generation: the [View] button
Only part of the AI analysis results is shown.
- - If there is not enough chat and viewer count data, AI analysis results may be provided only in a limited form.
- - For Custom RTMP broadcasts, analysis of viewer reactions (chat, viewer count, and so on) is not provided.
Inquiries about AI Live Insights
How do I create AI Live Insights?
-
- 1. On the live broadcast end screen or in MY > Broadcast history, tap the [Generate] button for [AI Live Insights].
- 2. On the preparation screen, check the required credits and the estimated time.
- 3. Tap the [Generate] button to start.
- 4. When generation is complete you are taken to the result screen, and afterwards you can check it again at any time with the [View AI Live Insights] button in MY > Broadcast history.
- * Generated AI Live Insights results are kept on the server, so you can check them even after deleting and reinstalling the app.
What can I see in AI Live Insights?
The result screen has three tabs: [Overview], [Timeline], and [Script].
-
-
Overview tab
- Overall summary: shows a summary of the whole broadcast. If you streamed to multiple platforms at once, it also shows which platform ranked first for chat participation, new subscriptions, donations, and viewer growth.
- Key moments: shows the key moments of the broadcast as cards, along with a viewer count graph. Tapping a point on the graph shows the card for that moment.
- Revenue comparison by platform: if you streamed to multiple platforms at once, it compares revenue by platform. It is not provided for platforms whose revenue data cannot be retrieved.
- Broadcast performance: check broadcast time, subscriber (follower) change, peak viewers, chat count, and revenue by platform.
- Sentiment analysis: shows the mood of viewer chat as positive / neutral / negative ratios.
- Chat activity: shows the chat count by time in a graph.
- Comment of the day: picks and shows the single most positive message from the chat.
- Viewer questions: organizes and shows the questions viewers left in chat.
- To-dos / promises: organizes and shows the to-dos and promises to viewers mentioned during the broadcast.
-
Overview tab
-
-
Timeline tab
- Divides the flow of the broadcast into segments and shows a title and summary for each one.
- Segments with key events such as peak revenue, a surge in responders, or drop-off are marked with an event badge.
-
Timeline tab
-
-
Script tab
- You can check the script of the live broadcast.
-
Script tab
I want to save the broadcast script as a file.
- 1. On the AI Live Insights result screen, select the [Script] tab.
- 2. Tap the script download button on the screen.
- 3. Choose the file format you want: TXT, SRT, or CSV.
- 4. Select a save location or an app to share with from your device's share menu to finish saving.
Inquiries about AI Clip generation
How do I create an AI Clip?
- 1. On the live broadcast end screen or in MY > Broadcast history, tap the [Generate] button for [AI Clip generation].
- 2. On the preparation screen, choose the clip length. You can choose Auto (3s-3m), under 30s, 30s-60s, 60s-90s, or 90s-3m; Auto (3s-3m) is recommended by default.
- 3. Set an analysis range if you need one.
- 4. Check the required credits and tap the [Generate] button to start.
What is the analysis range?
This lets you specify the part of the video from which clips will be extracted. Analyzing only the part you need saves credits.
-
- 1. On the AI Clip generation preparation screen, tap the analysis range area.
- 2. Drag the start and end points on the timeline at the bottom to set the range to analyze. You can play the video to check the range.
- 3. Tap the [Apply] button to apply the range you set, and the credits you save are shown.
- * The analysis range can be set from a minimum of 5 minutes to a maximum of 5 hours.
How do I check and save the clips that were created?
When generation is complete, the clip list screen appears.
-
- - Each clip shows an AI rating score, a title, and its time range in the original video.
- - Special moments such as a chat surge, a viewer surge, or a donation moment are marked with an event badge.
- - Tapping a clip card lets you play the video on the detail screen, and you can swipe up or down to move to another clip.
-
-
Saving several clips at once
1. On the clip list screen, tap the [Select] button.
-
2. Select the clips you want to save and tap the [Save] button.
-
3. The encoding progress is shown, and when it finishes the message "The video has been saved." appears.
-
Saving several clips at once
-
-
Saving a single clip
1. On the detail screen of the clip you want to save, tap the [Save] button.
-
2. When encoding finishes, it is saved to your device.
-
Saving a single clip
-
- * Clips are saved in the same format as the original video, and while saving you cannot do anything other than cancel.
- * You can rate a clip with the like / dislike buttons on the clip detail screen. Your ratings are used afterward to improve the quality of clip generation.
I want to remove the watermark from my clip.
PRISM Credits are used to generate clips, and watermark removal is provided as a PRISM Plus subscription benefit. If you subscribe to Plus, you can use the watermark removal feature from PRISM app Settings > Live settings.
I want to see a saved clip again later.
- - If the clip you generated is saved in your device's photo library, you can check it again with the [View AI Clip] button in MY > Broadcast history.
- - If you delete the app, the clip link information is deleted as well and the [View AI Clip] button no longer appears. The saved clip itself can still be found in your device's photo library.
AI feature error inquiries
The message "Generation failed." appears.
- - Network connection failure: check your network connection and try again in a moment.
- - Data collection and upload error: tap [Retry] to continue and try again. If you tap [Cancel], the credits used are restored.
- - Server or analysis error: please try again in a moment. The credits used are restored automatically.
The message "There is not enough storage space on your device." appears.
To use the AI features, the live video must be saved to your device. Please free up storage space on your device and try again.
-
- * For 1080p 60fps, one minute of video is roughly 100MB.
The message "Part of the broadcast video was not saved." appears.
This appears when the video for part of the broadcast was not saved to your device. If you select [Continue], AI generation proceeds using only the saved portions, and the missing portions are not used in the analysis.
Connecting External Devices
Can I use PRISM with a webcam or a DSLR camera?
This feature is currently not available and will be reviewed in the future. We apologize as we cannot provide the exact date of service as of this moment.
Can I connect an external microphone?
You can connect and use 3.5mm, USB, or Bluetooth microphones with your mobile device for live streaming or video recording.
-
Using an external microphone in the app
Audio output from web or media sources added in My Studio is included in the broadcast screen through the device’s internal capture or speakers.
Can I connect the camera on PRISM mobile to PC as webcam source?
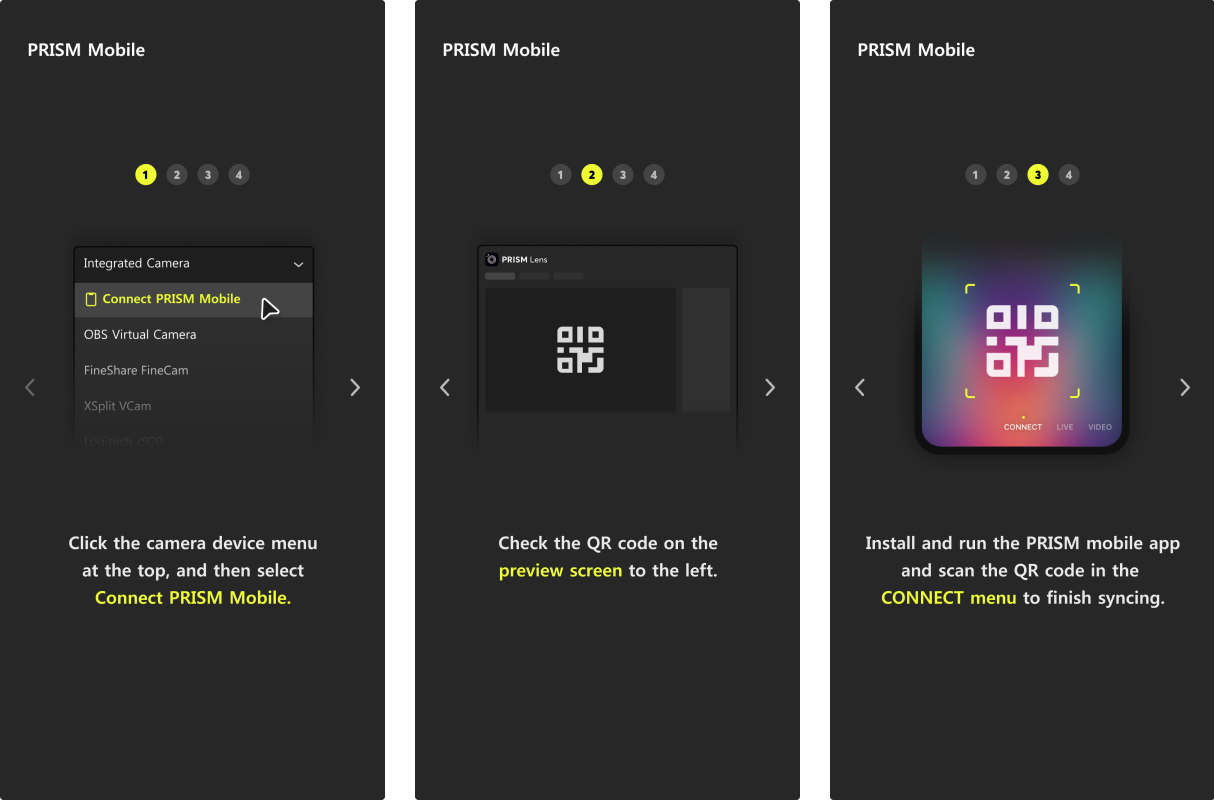
You can use the camera on PRISM mobile during a PC live stream by connecting it as a webcam source on PRISM via PC. You can connect screens, such as mobile camera and screencast, and connect multiple mobile devices to one PC.
-
-
1) Connecting via WiFi
* The mobile device and PC must be connected to the same WiFi network. - 1. Install and open the PRISM PC (Windows) app, and add a mobile source.
- 2. On the PC screen, check the QR code on the mobile source properties window.
- 3. Go to the [Connect] tab at the bottom of the PRISM mobile app, and the scan the QR code on the PC screen to complete the connection.
-
1) Connecting via WiFi
-
2) Connecting via USB
This feature is coming soon.
Accounts
How do I sign up, log in, and log out of PRISM Live Studio?
-
- How to create an account and log in
-
• You can easily log in with your email or other social media accounts, such as NAVER, LINE, Facebook, Google, Twitch, and X.
-
- How to log out
-
1. Click the profile button at the top right corner and go to Settings.
-
2. Settings > My Account > Click [Log out]
• When logging out, all the broadcast destinations you set and sources in My Studio will disappear.
How do I permanently delete my account?
-
You can delete your PRISM Live Studio account permanently in the
[Settings] menu of your app.
Go to Settings > General > Manage Account > Delete your account, review the information, and select [Delete your account].
The stream destinations you set and sources in My Studio will disappear when you delete your account.
Note: You can’t delete your account if your PRISM Plus subscription is still active.
Please wait until it ends, or cancel and request a refund, and then try again.
You can view the refund policy in: PRISM Plus Subscription Inquiries > Can I get a refund for PRISM Plus?
How do I change my password?
You can change your password when you logged in Prism Live Studio with an
email address.
Go to [Settings > My Account >
Change Password].
Enter your current and new passwords to change it.
I forgot my password.
If you log in with email address, you can receive a temporary password.
- 1. Tap [Forgot your password?] in the login page.
- 2. Enter your email address used to sign up.
- 3. A temporary password is sent to the email address you provided.
- 4. Use the temporary password to log in to PRISM Live Studio.
Inquiries about PRISM Plus Subscription
What is PRISM Plus?
PRISM Plus is a subscription service. It gives full access to all the
premium features of PRISM Live Studio.
One subscription covers PRISM Desktop, Mobile, and Lens apps.
How do I start a PRISM Plus subscription?
You can subscribe through the PRISM Live mobile app.
Open the app and tap the ”Plus” button at the top right. Check out the
premium benefits.
Then tap the “Go to Subscribe” button to start the process.
What are the payment methods and billing cycles?
PRISM Plus supports only in-app purchases via Google or Apple.
Before subscribing, make sure your store account has a valid payment method.
You can choose between monthly or yearly billing.
Billing occurs every month or year, depending on your choice. The billing
date is the same as your first payment date.
(If that date doesn’t exist in a certain month, billing will be on the last
day of that month.)
Where can I manage (cancel/change) my subscription?
You can manage your subscription in the following ways:
- - In the PRISM Live mobile app: Top right profile picture > Settings icon next to your nickname > “Manage Subscription” in the settings page
-
- In your app store’s subscription or billing settings
- 1. Apple in-app purchases: App Store > Account > Subscriptions
- 2. Google in-app purchases: Google Play Store > Account > Payments & Subscriptions
Can I change the billing cycle?
-
1. Apple in-app purchase:
- - You can change from monthly to yearly (or vice versa) in the subscription settings.
- - The change will come into effect on the next billing date.
-
2. Google in-app purchase:
- - Cancel your current subscription. After it expires, subscribe again with the new billing cycle.
If I cancel, will the benefits stop right away?
Canceling your subscription via the method above only stops the next
billing.
You can still use the benefits until the current paid period ends.
To avoid the next billing, cancel at least 24 hours before the next renewal
date.
Can I get a refund?
-
1. Apple in-app purchase:
- - Refund requests must go through Apple Support.
- - Apple makes the decision on refunds based on its policy, which means a refund may not be possible.
- - PRISM Live Studio cannot check the refund status or the reason for rejection.
- - [Go to Apple Refund Request]
-
2. Google in-app purchase:-
- Refund requests for Google Play in-app purchases must be made
via Google Play Store Customer Support and are subject to
Google’s refund policy.
- [Go to Google Play Refund Request]
-
- Refund requests for Google Play in-app purchases must be made
via Google Play Store Customer Support and are subject to
Google’s refund policy.
I paid but cannot use Plus benefits.
Try the following:
-
1. iOS:
- - PRISM Live app > Top right profile > Settings icon > Tap “Restore Subscription”
-
2. Android:
- - Main screen > Tap ”Plus” > Tap “Go to Subscribe” again
- - If this causes a double payment, the earlier one will be refunded automatically within 3 days. If you still have not been refunded, contact PRISM Live Studio.
If the problem persists, contact PRISM Live Studio:
PRISM Live app > Profile > Settings > Contact Us (Select
"Subscription Inquiry")
PRISM Plus subscription not showing in your store account
If you use multiple Apple App Store or Google Play Store accounts, please make sure you're logged in with the store account that was used to purchase the PRISM Plus subscription. (For the Google Play Store, the Google account that was set as the default in the Play Store at the time of the app's installation may have been used for the payment.)
I started with a free trial, but I was charged immediately.
If you were charged immediately after attempting to start a free trial, it may be due to one of the following reasons:
-
1. You have previously used a free trial or an active PRISM Plus
subscription.
- - The free trial is offered only once.
-
2. According to Google / Apple store policies, you are not eligible for
a free trial.
- - During the final payment process, a charge may occur if the store determines that you are not eligible for a free trial based on its policies.
- - As PRISM Live Studio cannot access the reason, please contact the customer support of the store you used to check the details and request a refund if necessary.
I can’t find the account I used to subscribe.
If you don’t remember your account, please do the following and contact PRISM Live Studio:
-
1. Apple in-app purchase:
- - Open your receipt email > Find “Order ID” and “Document Number”
-
2. Google in-app purchase:
- - Open your Google Play receipt email > Find “Order Number”
(iOS) A duplicate payment has occurred.
If a duplicate payment has occurred due to a temporary error during your
subscription, a billing information issue, or other related factors, you can
request a refund via the link below.
[Go to Apple RefundRequest]
-
- - Refund requests must go through Apple Support.
- - Apple makes the decision on refunds based on its policy, which means a refund may not be possible. PRISM Live Studio cannot check the refund status or the reason for rejection.
Inquiries about PRISM Credits
What are PRISM Credits?
PRISM Credits unlock PRISM’s AI features(such as AI Live Insight and AI Clip generation). Buy as many as you need and use them whether or not you have PRISM Plus.
How do I get credits?
There are two ways.
-
1. Monthly subscription — a set number of credits is added automatically each month (cheaper per credit than one-time top-ups).
2. One-time top-up — you can purchase as many credits as you want, whenever you need them.
Credit purchases are currently available only in the mobile app.
Where can I use credits?
Currently you can use them for AI Live Insights (analysis of stream performance, viewer reactions, and more) and AI Clip generation (automatic highlight creation), and the range of available AI features will continue to expand.
How long do credits last, and which are used first?
Subscription credits are valid for 1 month, and top-up credits are valid for 5 years.
Subscription credits expire sooner, so they’re used first. Top-up credits are used after that.
Do I need a PRISM Plus subscription to use credits?
No. PRISM Credits are a separate product from PRISM Plus.
Even without a Plus subscription, you can purchase credits on their own to use AI features.
PRISM Plus provide premium broadcasting features, while PRISM Credits provides AI features.
What payment methods and billing cycles apply to credits?
-
PRISM Credits supports only Google/Apple in-app payment.
Before you pay, please check that the payment method registered to the store account you are using is valid and available. -
Subscriptions are billed automatically each month through in-app payment, and the billing date is based on the date of your first payment. (If that date does not exist in a given month, payment may be processed on the last day of that month.)
A top-up is charged once each time you need it.
Where can I manage my credit subscription (cancel/change)?
You can manage your subscription in the following ways.
-
1. PRISM mobile app (iOS)
- Profile image at the top right of the app > settings icon next to your nickname > Settings > PRISM Credits information > Manage subscription -
2. The app store you are using
- Apple in-app payment: App Store > Account > Subscriptions
- Google in-app payment: Google Play Store > Account > Payments & subscriptions
Where can I check my credit top-up and usage history?
You can check your top-up history and usage history on the My Credits screen.
-
How to get there
- Profile image at the top right of the PRISM mobile app > settings icon next to your nickname > Settings > PRISM Credits information > My Credits -
- Top-up history: shows the credits you received through subscriptions and top-ups, along with expiration records, in most-recent order.
- Usage history: shows the credits you used for each AI feature, in most-recent order.
You can view records from the last 1 year for both the top-up history and the usage history.
What happens to my remaining credits if I cancel?
Even if you cancel your subscription, subscription credits already granted remain usable until the end of their validity period (1 month), and top-up credits remain usable within their validity period (5 years).
I paid, but my subscription wasn't applied or my credits weren't topped up.
If your subscription was not applied or your purchased credits were not granted even though your payment was completed, you can try the following.
-
1. iOS mobile app
- Go to Profile image > settings next to your nickname > Settings > PRISM Credits information > Restore subscription to restore your purchase. -
2. Android mobile app
- On the credit purchase screen, select the subscription or top-up button for the item you previously purchased again. -
If the problem continues after trying the above, please contact PRISM Live Studio Customer Support through the path below.
- PRISM Live mobile app > Profile image > settings next to your nickname > Settings > Contact us (inquiry type: PRISM Credits inquiry)
Can I get a refund for a credit payment?
-
1. If you subscribed through Apple in-app payment
- For Apple in-app payments, refund requests can only be made through Apple Customer Support in accordance with Apple's policy.
- Because refunds are determined by Apple's policy, a refund may not be possible, and please understand that PRISM Live Studio cannot check the refund progress or the reason for rejection.
- [Go to Apple refund request] -
2. If you subscribed through Google Play Store in-app payment
- Refunds for Google Play in-app payments can be requested through Google Play Store Customer Support, and whether a refund is possible follows Google's policy.
- [Go to Google Play refund request]
(iOS) I was charged twice.
If a duplicate payment occurs due to a temporary error during a subscription, a payment information issue, and so on, you can request a refund through the path below.
[Go to Apple refund request]
-
- For Apple in-app payments, refund requests can only be made through Apple Customer Support in accordance with Apple's policy.
- Because refunds are determined by Apple's policy, a refund may not be possible, and please understand that PRISM Live Studio cannot check the refund progress or the reason for rejection.
Errors
I'm having trouble installing the PRISM Live Studio app.
The following cases may cause an error in the app installation process. Please follow the instructions below and try again.
-
-
Insufficient space on the device
• Delete unused apps or files to free up space and re-install the app.
-
Insufficient space on the device
-
-
Temporary error while downloading an app in the app
store
• Reboot the device and re-install the app.
-
Temporary error while downloading an app in the app
store
If you still cannot download the PRISM Live Studio app after checking the above, please contact us via Service Inquiry.
I'm having trouble updating to the latest version of the PRISM Live Studio app for iOS.
- If you're using iOS, the [Open] button may appear instead of [Update] button in the App Store even though you don't have the latest version of your app.
- Please follow the instructions below to fix this issue.
-
- 1. Delete the PRISM Live Studio app you're currently using.
- 2. Force shutdown your device and then restart it.
- 3. Go to the App Store and download the app again.
- If the same problem still persists, contact us here.
What should I do if I'm having trouble using the PRISM Live Studio app?
Errors may occur while using PRISM Live Studio due to various
environment-related issues in network, device, and associated services.
If
errors occur while using the service, please check below.
-
- A “Network Error” message appears.
-
• You are currently not connected to the network. Please try again after checking mobile cellular data or Wi-Fi is turned on.
-
- A “Login Error” message appears.
-
• This may be due to wrong social media information saved on the device or the slow response speed of social media authentication.
-
• Try again in the PRISM Live app after logging in again to the social media app.
-
• Try again after changing the network you are currently using.
-
- A “Temporary Error” message appears.
-
• Service use may be restricted depending on the device’s settings, network settings and environment. Please check the following.
-
• Make sure that the current time and time zone setting on your device are set properly for your region.
-
• You may see a temporary error message if you are in a bad network environment.
Internet access may be restricted by the network you are currently connected to. -
• Please open your browser to check your internet connection is working and try again.
- * It is recommended to keep your app up to date so that your app is most reliable with latest features.
- If the error persists after checking the above, please contact us via Service Inquiry.
Others
How do I change the screen orientation?
It automatically adjusts to the orientation of your device before you stream
live or record a video.
Make sure that the orientation lock is turned off
if the screen doesn't rotate on your device.
How do I change the language on the PRISM Live Studio app?
PRISM Live Studio currently supports Korean, English, Indonesian,
Portuguese, Spanish, Vietnamese, Thai, Russian, and Japanese. The default
language of the app will be the language your device is currently set
to.
You can change the language for the PRISM Live Studio app by changing your
device's language settings.
Can I record my smartphone screen?
Both Android and iOS do not support the features.
Do you need anything further?
Please tap the link below if you need any further information.
Contact Us here


 ” icon,