Here are some questions you may have.

Frequently Asked Questions

What is PRISM Live Studio?

PRISM Live Studio is a service that allows you to record and edit diverse live streams, videos, and photos with a variety of effects.
Add various media files such as fun stickers, videos, images, and music to easily create your own special videos.

What can I do with PRISM Live Studio?

You can use PRISM Live Studio to create live broadcasts, record videos, and take photos.
After launching the app, then tap either the CONNECT, LIVE, VIDEO, and PHOTO buttons at the bottom.
You can freely change to your desired filming mode.

Live Broadcasting Mode

Which live streaming platforms are supported by PRISM Live Studio?

Using PRISM Live Studio, you can conduct live broadcasts on various platforms such as YouTube, Facebook, CHZZK, NAVER Shopping Live, BAND, NAVER TV, AfreecaTV, Twitch, and various RTMP URLs.
If you need more information about streaming with platform account login, go to the help page about connecting to streaming platforms. In addition, if you want to know how to stream live RTMP keys, go to the help page about setting up RTMP.

I'd like to connect to streaming platforms like YouTube or Twitch.

  • Connect to streaming platforms.
    • 1. Tap the Ready button on the broadcast preparation screen.

    • 2. Move to the platform selection screen.

    • 3. Choose the platform you wish to connect.
      • Once you log in to the platform, the streaming platform will be connected automatically.
      • After the initial login, you will be able to continually broadcast through the connected platform.
      • To add more platforms, before the Go live stage, select the [My Channel] button > Go to the platform addition screen > Select the [+] button > Move to the platform selection screen and add the platform.

  • Disconnect from streaming platforms.
    • 1. Select [My Channel] > Choose the platform from the list of added platforms > Select the disconnect button next to the [Platform Name].

    • 2. On the broadcast preparation screen, select the user profile in the upper right corner > Choose the gear icon on the right of the username > Settings > Select Live Service Accounts > Click the Disconnect button next to the platform name.

How do I set up a RTMP server to stream live videos?

  • 1. Select the Ready button on the broadcast preparation screen.

  • 2. Move to the platform selection screen.

  • 3. Choose the platform you want.

  • 4. Select the RTMP manual input button at the bottom of the screen for the chosen platform or choose Custom RTMP.

  • 5. If you choose Custom RTMP, select the angle bracket to the right of the Stream URL to select one of the preset lists of popular streaming platforms. Choose the desired RTMP address.

  • 6. After entering the additional required options, press the "Save" button to create a new RTMP server. Upon logging into the respective platform, the streaming platform will be automatically connected.


Note: NAVER Shopping Live does not support RTMP.

Where can I find the stream key of the RTMP server?

  • In order to broadcast to an RTMP server, you must enter the stream keys that can be found on each platform into PRISM Live Studio.

  • 1. Checking the stream key on YouTube

    * It is recommended you check the following on a PC.

    • • Visit the page below to find the stream key on YouTube.

      https://www.youtube.com/live_dashboard

    • • Log in to the YouTube account you wish to broadcast to.
    • • Find the [Stream name/key] available under [Encoder Setup] on the Live Dashboard.
    • • Enter the stream key into the RTMP setup page of PRISM Live Studio and start broadcasting.
  • 2. Checking the stream key on Facebook

    * The following is only available on PC.

    • • Visit the page below to find the stream key on Facebook.

      https://www.facebook.com/

    • • Log in to the Facebook account you wish to broadcast to.
    • • Click on the [Live Video] option in the status section.
    • • Go to the [Connect] tab and copy the codes shown under [Stream Key].
    • • Enter the stream key into the RTMP setup page of PRISM Live Studio and start broadcasting.
  • 3. Checking the stream key on Twitch

    * It is recommended you check the following on a PC.

    • • Log in with the Twitch account you wish to broadcast to.
    • • Visit the URL below to find the stream key on Twitch.

      https://www.twitch.tv/prismlive/dashboard/settings

    • • Log in to the Twitch account you wish to broadcast to.
    • • Go to [Settings > Channel] available at the bottom-left menu.
    • • Click on [Stream Key], then click on the [Show Key] button and copy the key.
    • • Enter the stream key into the RTMP setup page of PRISM Live Studio and start broadcasting.
  • 4. Checking the stream key on BAND

    * It is recommended to check the key on a PC.

    • • Visit the page below to find the stream key on BAND.

      https://band.us

    • • Log in to the BAND account you wish to broadcast to.
    • • Go to the [Live stream] menu to get and copy the stream URL and key.
    • • Enter the stream key into the RTMP setup page of PRISM Live Studio and start broadcasting.
  • 5. Checking the stream key on NAVER TV

    * It is recommended you check the following on a PC.

    • • Visit the page below to find the stream key on NAVER TV.

      https://studio.tv.naver.com/live

    • • Log in to the NAVER account you wish to broadcast to. (Please note that only accounts that own a NAVER TV Channel can check the stream key.)
    • • Go to the broadcast list and check the codes in the [Stream Settings], available at the right of the Start/Edit page.
    • • Enter the stream key into the RTMP setup page of PRISM Live Studio and start broadcasting.
  • 6. Checking the stream key on afreecaTV

    * It is recommended you check the following on a PC.

    • • Visit the URL below to find the stream key on Afreeca TV.

      http://dashboard.afreecatv.com/

    • • Log in to the Afreeca TV account you wish to broadcast to.
    • • Go to the [Encoder Settings], available at the bottom of the [Dashboard], and check the [Stream Name].
    • • Enter the stream key into the RTMP setup page of PRISM Live Studio and start broadcasting.
  • 7. Checking the stream key on kakaoTV

    * It is recommended you check the following on a PC.

    • • Visit the URL below to find the stream key on kakaoTV.

      https://tv.kakao.com/studio/live/start

    • • Log in to the kakaoTV account you wish to broadcast to.
    • • Go to the [Stream Settings], and click the [Stream key] button.
    • • Enter the stream key into the RTMP setup page of PRISM Live Studio and start broadcasting.

Can I broadcast on multiple platforms simultaneously?

You can simultaneously broadcast to a maximum of 6 channels at once.


Preparing for Multistreaming
  • 1. Go to the screen where you select channels.
    Refer to the Broadcasting Platform Integration Guide for guidance to find this screen.

  • 2. Turn on the switch to the right of the platform name in the My Channels list.

  • 3. When you turn on the switches for 2 or more platforms, the multistreaming icon will turn on, automatically switching to multistreaming mode.

  • 4. NAVER Shopping Live does not support multistreaming.
    Select the X button at the bottom of the screen to move to the broadcast preparation screen.

  • 5. Choose the Go Live button to start multistreaming.

How do I change the encoding settings?

You can set the desired quality of a live video according to the network and device performance. Select the button that indicates resolution on the broadcast preparation screen, and the encoding setting layer will be visible. Encoding settings are not supported for V LIVE channels. Please note that you cannot change the settings once the broadcast starts.


In the encoding settings layer, you can change option values as follows.

  • 1) Adaptive Bitrate
    : This is a feature that analyzes the network in real-time during a broadcast to automatically find and adjust to the optimal Bitrate and FPS. If you set it to 'On', the image quality may be reduced although it enables a stable live broadcast. Thus, you can set it to 'Off' if you would like to keep the image quality although buffering may occur during the broadcast.
  • 2) Resolution
    : Resolution refers to clarity (or image quality) of an image. If you broadcast for a long time with high resolution, heating may occur. So, consider the broadcast content before setting. In order to maintain a stable broadcast quality, the use of some effects may be limited when the resolution is set at 1080p. Please note that some platforms may not support 1080p (e.g. Facebook and Periscope).
  • 3) Bitrate
    : Bitrate refers to the amount of data sent per second. The higher the Bitrate is, the higher the broadcast image quality becomes; however, as it makes the image size larger, the broadcast may not be smooth if the network is not good.
    : We recommend using Bitrate by resolution as follows.
    360p (1~2Mbps), 720p (2~4Mbps), 1080p(4~6Mbps)
  • 4) Frame Rate
    : Frame rate refers to the number of frames (images) composing a video in one second. The higher the number of frames you set, the smoother the motion and more natural the broadcast becomes.
    : In normal live broadcasting, we recommend using 30fps
  • 5) Keyframe Interval
    : Keyframe Interval refers to the cycle (seconds) when I-Frame (mainframe that composes a video) is inserted, among the frames that compose an image.
    : In normal live broadcasting, we recommend using 1-2 seconds.

I want to flip the camera horizontally.

Press the [See more] button at the top left of the filming screen, and a menu will be shown that allows you to turn on/off the option to flip camera image horizontally.
It can only be applied when using the front-facing camera, and the camera image cannot be flipped when using the rear camera.

What modes are provided when swiping left or right?

Switching modes is available while you stream live or you are in the broadcast preparation screen.

video only mode
Swipe left. Video only mode
live broadcast
Default. Live broadcast
My Studio
Swipe right. My Studio
  • 1) Switch to Video only mode

    Swipe right to go to Video only mode and the live chat and the broadcast preparation window disappear.
    In Video only mode, you can concentrate on the live video and easily change the scale or position of sources.

  • 2) Switch to My Studio

    Swipe left to go to My Studio.
    In My Studio, you can manage media files you want to add to your live.
    For more information about My Studio, go to the help page about My Studio.

Can I link donation services like Twip to My Studio to broadcast a live stream?

Try the webpage source function in My Studio. For iPhone users, this function is available only on iOS 11 or higher. Please note that videos and sounds from some webpages may not play normal due to technical constraints.

  • 1) Adding a webpage

    Press [Web] in My Studio. Copy and paste the URL of the widgets, then press [Save].

  • 2) Selecting a source from My Studio

    Select the webpage you wish to add from the list of sources in My Studio. Adjust the position and size of the webpage.

  • 3) Layer lock settings

    Switching the layer lock settings to on enables the webpage source to remain unmoved even if touched, making it convenient when streaming gameplay. To switch the layer lock settings to off, go to My Studio and press the more button.

  • 4) Editing a webpage size

    After inserting a web source on the screen, use the +/- button to zoom in or out its content.

I want to share my mobile screen with viewers.

  • Using Screencast (broadcasting your mobile screen)
    • 1. Tap [Screen] on the broadcast preparation screen.

    • 2. Make sure to allow all of the necessary permissions required to use Screencast (app displayed on top of other apps and taking screenshots of all screens). - You will be asked for the permissions when you open the app for the first time. You can also allow them before going live.

    • 3. Select the [Ready] button.

    • 4. After Screencast has started, there will be a 3-second countdown for you to transmit your screen.

    • 5. Move to your device's home screen while staying live.

    • 6. Start the game or app you wish to share.

    • 7. Check if the desired screen appears on the service screen of the platform you wish to broadcast to.

  • You can use the Screencast broadcast control panel at the top of the mobile device screen while using Screencast on Android.

    • 1. Select the round PRISM icon on the mobile device screen.

    • 2. In the Screencast broadcast control panel, you can chat, adjust the sound and microphone volume, and protect the transmission screen (a feature similar to a screensaver).

What is an intro and how do I set it up?

Intro is a feature that automatically plays video clips and images before your broadcast begins.

    • Make an intro using images and video clips
    • 1. Tap [Intro] (icon image) below the platform profile in the broadcast preparation screen.
      a. Select the video and image assets in My Studio.
      b. You can make an intro with the sources saved in My Studio.

    • 2. Make sure that you import sources to My Studio before making an intro.

    • 3. Change the video size using the zoom in/out feature located in the lower left of the screen.
      Use the bar at the bottom to set the beginning or end of your intro. The adjusted duration of the video is applicable only within the intro. - You can set the duration of an intro in the lower right of the screen.

    • 4. Tap [Done] to complete the process.

    • Check the intro
    • 1. Check the intro source thumbnail that has been set in the intro button area.

    • 2. Selecting the area will allow you to edit or disable the intro.

Is there a chat feature available?

Chat feature is available when streaming to the platform connected via account login.
If you wish to share chat messages with viewers, you can use the [Comment Pick] feature.
If you press and hold on the message desired, the message will be fixed on the broadcast screen.

Can I block chats for specific viewers?

Chatting for specific viewers can be blocked via the PRISM Live Studio chat window. Press and hold the comment of the viewer you wish to block, and the related menu will be displayed. Viewer chats can be deleted or blocked by pressing the [Report] button for NAVER TV and V LIVE, and the [Block] button for YouTube.

I'd like to promote my live videos using SNS.

You can share the URLs of your live videos to Facebook and X for certain platforms.

How can I screen a scene from streaming during a broadcast?

  • During a broadcast, you can turn off your microphone or camera.
    You can access these features by tapping the … button in the upper left of the screen.
  • Try using it if you encounter an unexpected situation during a live broadcast.

I want to record a live stream.

Recording camera and VTuber live streams does not require additional settings.
Go to See More in the upper left of the screen > Select [Save video after streaming] to download the recorded video to your device.

How can I get PRISM watermark removed?

Please go to the Prism app settings and turn on the setting of ‘Conceal watermark’. This option is available for those allowing PRISM Live Studio send notifications.
If notifications are turned off in the OS, go to Settings and change to receive notifications.

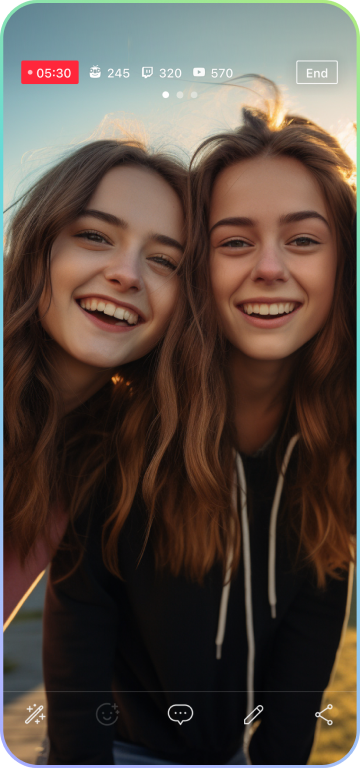
Ending your broadcast.

Once you start live broadcasting, an 'End' button will be exposed on the upper right side of the screen on your application. Clicking this 'End' button will end your live stream.

When you click the 'End' button, you will see a progress bar for a few seconds with a message saying 'Ending broadcast'.
If you click the 'Cancel' button at the bottom of the screen before the progress bar is completed, you can resume your live stream.

Even if the live broadcast appears to have ended on the content viewing platform during live streaming, the PRISM app may continue to be transmitting according to the RTMP policy of individual platforms.Therefore, in order to safely end the live broadcast, make sure you click the 'End' button.

My Studio and effects

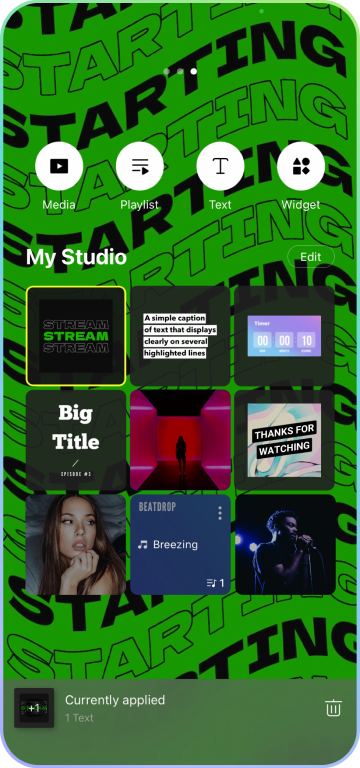
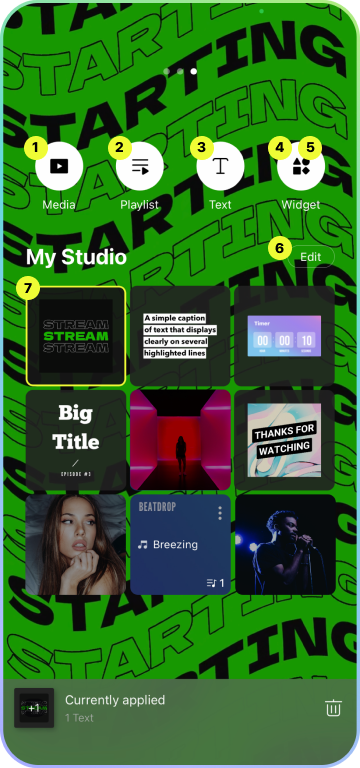
What features are available in My Studio?

My Studio features the ability to add media, music, texts, webpages, chat widget sources to your collection of assets and easily apply them to your videos.

My Studio
My Studio
  • 1. Add Media Source

    This feature allows you to import images and videos from your mobile device’s gallery, and add them to My Studio assets.

  • 2. Add Music Source

    This feature allows you to import songs from your mobile device’s music library and/or unique tracks provided exclusively by PRISM Live Studio, and add them to My Studio assets.

  • 3. Add Text Source

    This feature allows you to create text sources, and add them onto the screen whenever needed. Various motion templates designed by PRISM Live Studio are available for different use cases such as notices, titles, and or SNS account information. Once a text source is created within My Studio, it will keep its position and size as it was.

  • 4. Add Webpage Source

    This feature allows you to enter the web address of webpages and/or donation services, and add them to My Studio assets. Once you add a webpage to the screen, you can resize the source by dragging the edges while you can zoom in or out its content by pressing the +/- button. For reliable broadcasting quality, the maximum number of web sources may be limited.

  • 5. Add PRISM Chat Widget Source

    This feature allows you to add a chat widget, which compiles messages from viewers and displays them on the viewing screen, and add them to My Studio assets.

    You can select to either display on both viewers' and streamer's screens, or only on streamer's screen.

    You can also change the chat widget’s color, font, style, and more. Once you add a chat widget to the screen, you can resize by dragging the edges and change the font size by pressing the +/- button.

  • 6. Edit sources in My Studio

    You can delete or change the order of the sources saved in My Studio.

  • 7. Source collection in My Studio

    An area where imported images, videos, and music sources are saved.

    Tap the source to apply to the video easily.

I'd like to delete or move sources in My Studio.

Try using the edit feature in My Studio.
Click the [Edit] button in My Studio

    • Delete sources
    • 1. Select the sources you want to delete, and tap the “Delete” button in the upper right of the screen.

    • 2. The sources will be deleted from My Studio as well as videos applied with them.

    • Change the order to sources
    • 1. Tap and hold the sources you want to change order of.

    • 2. Frequently used sources can be placed on top for quick application.

Can I use music sources provided by PRISM Live Studio for free?

Music sources provided in My Studio > Music are tracks by top creators carefully selected through Premiumbeat and contests.
They can be used at your disposal within PRISM Live Studio.
Enjoy a variety of tracks to fit any mood such as Playful, Sentimental, Action, Beatdrop and Retro.

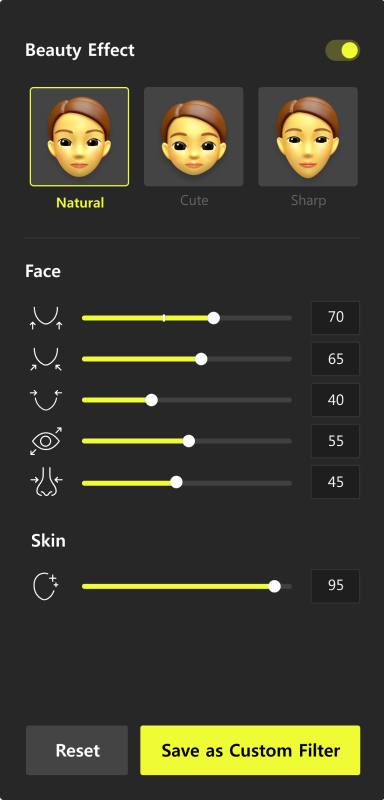
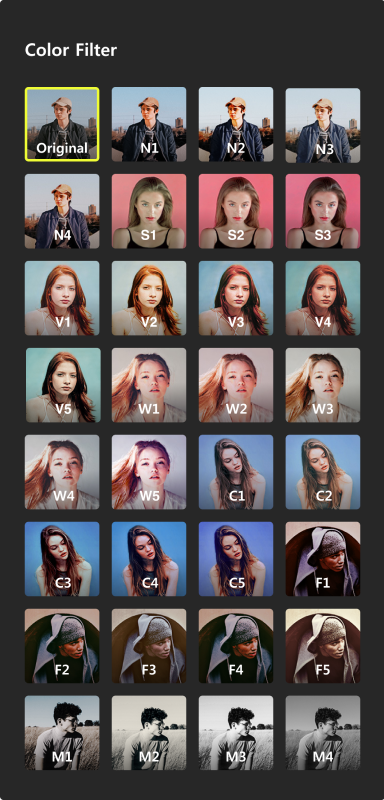
What effects can be used in PRISM Live Studio?

Tap the magic wand button  Tap the magic wand button to show various effects below.
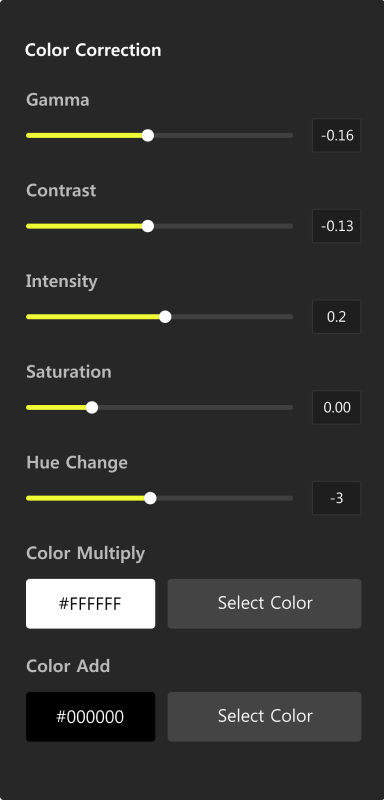
  • 1) Color filter  Color filter

    This allows you to change the overall scheme of colors.
    You are still allowed to use other effects with color filters on.

  • 2) Mask effect  Mask effect

    This recognizes your face and provides mask effects following your facial movement.

  • 3) Background effect  Background effect

    This helps you create a unique atmosphere by providing video frames and movie filters.
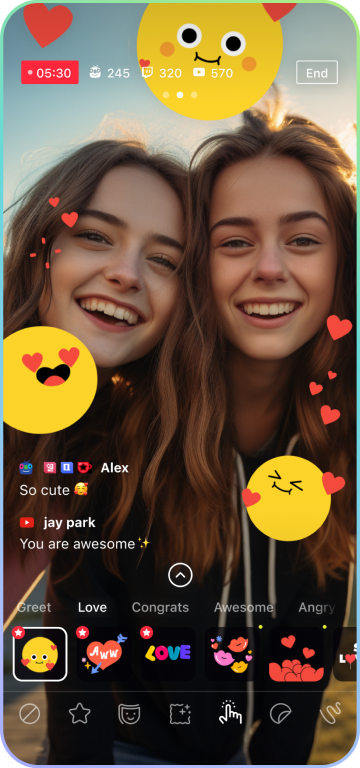
  • 4) Emotion effect  Emotion effect

    This creates a quick, creative, and fun storyline for the audience. Choose an emotion that best expresses your feelings and enjoy the various emotion effect options available to you.

  • 5) Drawing effect Drawing effect

    This allows you to draw on the screen with various colors and pens.

  • 6) Favorites Drawing effect

    This allows you to quickly find your favorite effects by saving them in one place. You can add an effect as a favorite by holding the item, and a second-holding will allow you to delete an existing favorite effect. You can also use the edit function to reorganize your favorite effects list.

  • 7) Giphy Stickers Drawing effect

    This allows you to utilize Giphy stickers on PRISM. Click the Giphy sticker menu, type in a search word, and use the various available Giphy stickers. After a Giphy sticker is added to the screen, you can edit its position and size. For reliable broadcasting quality, the total number of Giphy stickers used at once may be limited.

Connecting External Devices

Can I use PRISM with a webcam or a DSLR camera?

This feature is currently not available and will be reviewed in the future. We apologize as we cannot provide the exact date of service as of this moment.

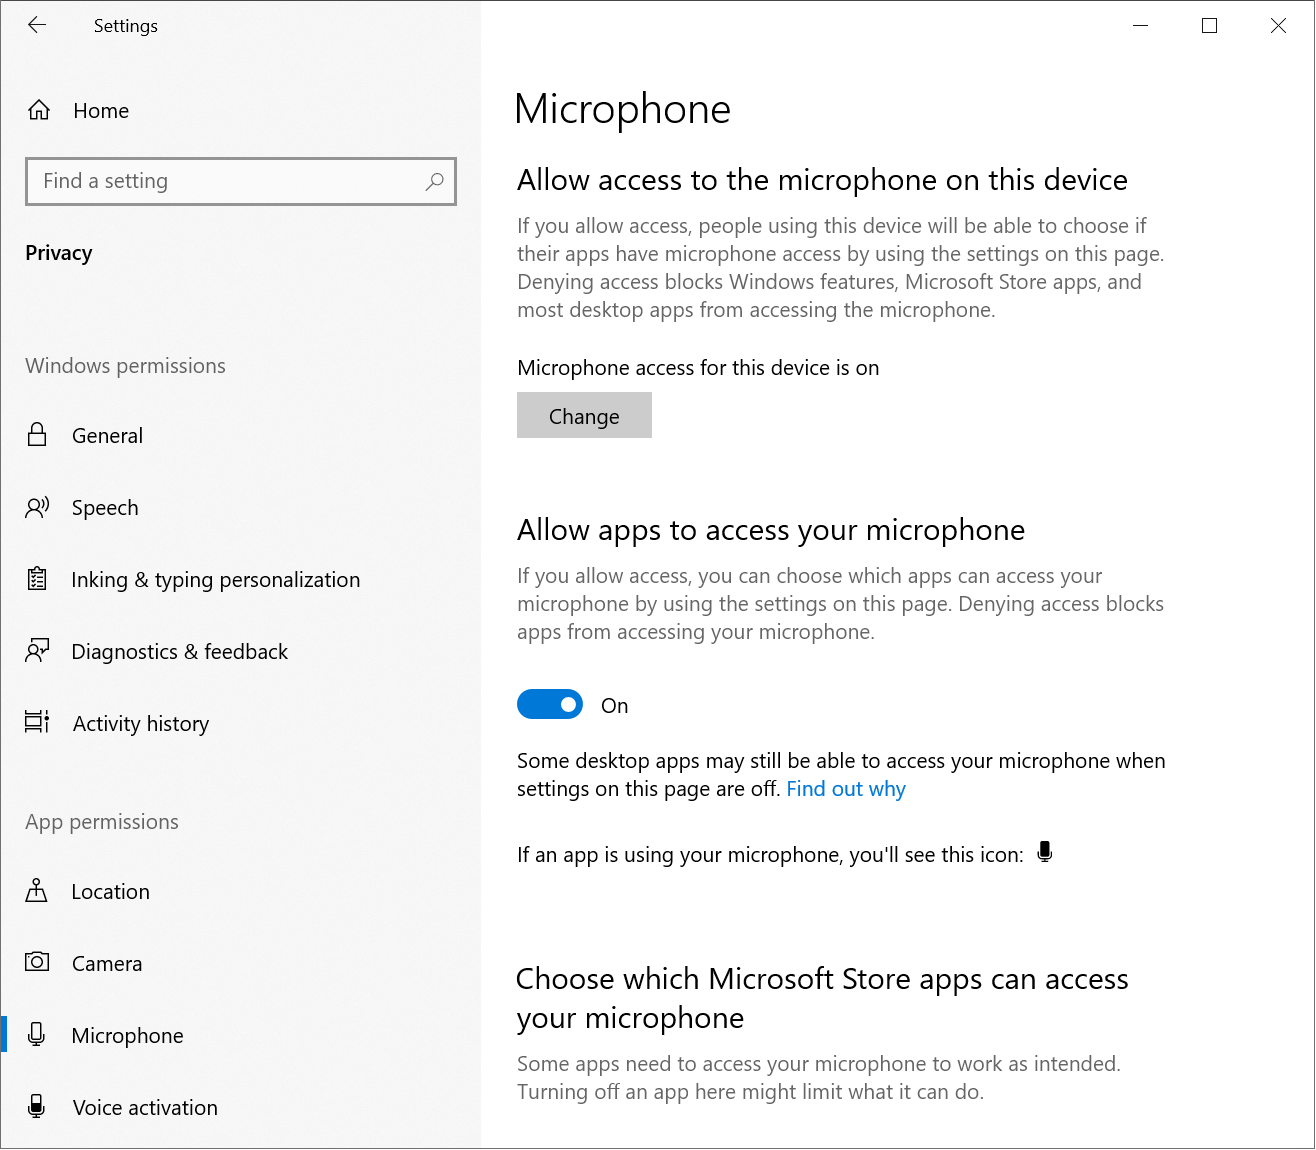
Can I connect an external microphone?

You can connect an external microphone device to your mobile device for live broadcasting and video recording. Bluetooth connected microphones, however, are not currently supported.

  • 1) Using an external microphone on an Android

    Connect a 3.5mm or USB microphone to your mobile device. While connected to an external microphone, the audio output of the webpage or media source of My Studio can be included in the broadcast through the speakers.

  • 2) Using an external microphone on an iOS

    Connect a 3.5mm or a lightning connector microphone to your mobile device. While connected to an external microphone, the audio output from the web or media source of My Studio can be included in the broadcast through the speakers.

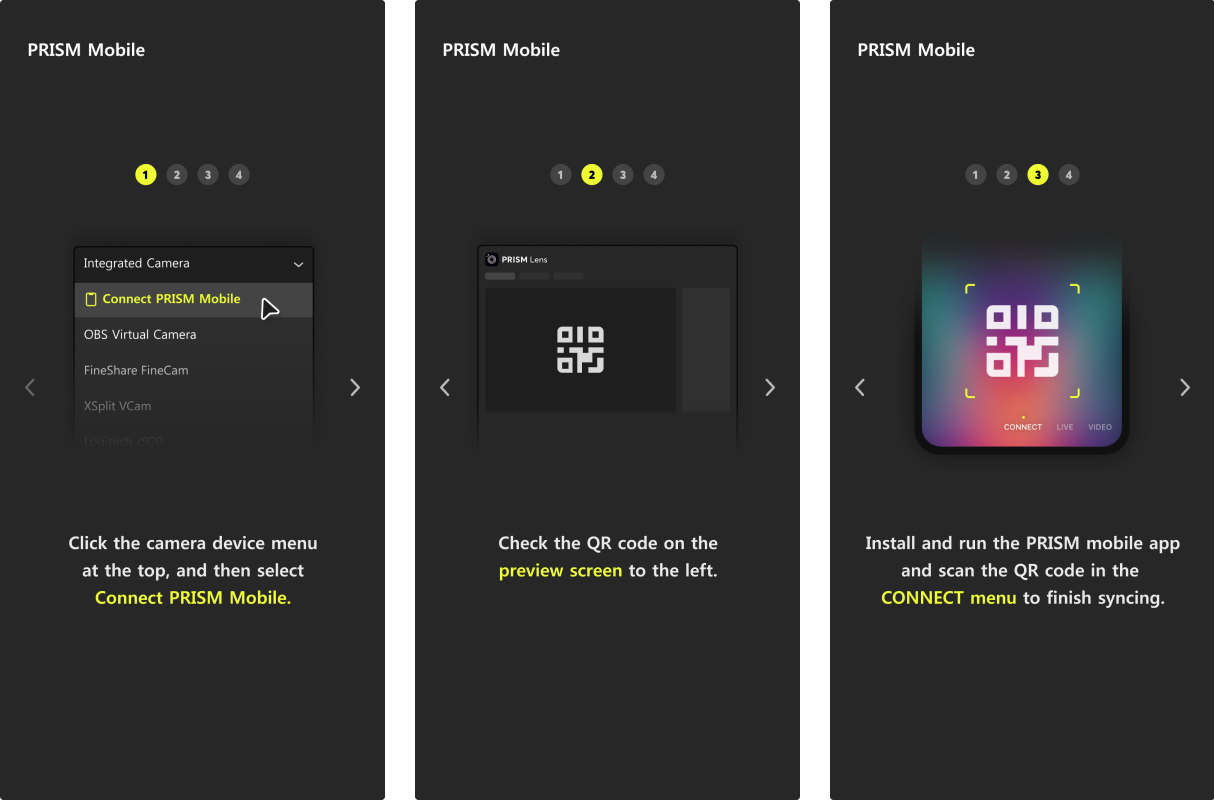
Can I connect the camera on PRISM mobile to PC as webcam source?

You can use the camera on PRISM mobile during a PC live stream by connecting it as a webcam source on PRISM via PC. You can connect screens, such as mobile camera and screencast, and connect multiple mobile devices to one PC.

    • 1) Connecting via WiFi
      * The mobile device and PC must be connected to the same WiFi network.
    • 1. Install and open the PRISM PC (Windows) app, and add a mobile source.
    • 2. On the PC screen, check the QR code on the mobile source properties window.
    • 3. Go to the [Connect] tab at the bottom of the PRISM mobile app, and the scan the QR code on the PC screen to complete the connection.
  • 2) Connecting via USB

    This feature is coming soon.

Video Filming and Editing

How do I use the video mode?

Film a video directly with the app, or select a video on your device to begin.
Tapping the recording button will immediately start a filming, which can be paused and then resumed to continue shooting. For Android devices, filming and editing is currently available for up to 30 minutes. Hold the button to activate the short video mode.
Activate [Save video after recording] to save your video automatically after filming.

What can I do after I finish filming?

Edit videos by pressing on the ‘Edit’ button on the preview page. Edit the clips as you wish by using the trim, divide, copy, add, and change order features.
You can also add transfer effects between clips. You can change the aspect ratio of the video, and apply background colors.
Try adding copyright free background music provided by PRISM Live Studio, or decorate your videos using different effects (Color filters, video effects, touch effects, drawing, text).

Can I store my drafts and continue editing later?

You can find all of your unfinished drafts in the ‘Video’ list of My Page. You can continue with editing at any time by selecting an item. To store your videos on My Page, press the ‘Save’ button on the upper right corner of the editing screen.

Can I record my smartphone screen?

Both Android and iOS do not support the features.

Accounts

How do I sign up, log in, and log out of PRISM Live Studio?

    • How to create an account and log in
    • • You can easily log in with your email or other social media accounts, such as NAVER, LINE, Facebook, Google, Twitch, and X.

    • How to log out
    • 1. Click the profile button at the top right corner and go to Settings.

    • 2. Settings > My Account > Click [Log out]
      • When logging out, all the broadcast destinations you set and sources in My Studio will disappear.

How do I permanently delete my account?

  • You can delete your PRISM Live Studio account permanently in the [Settings] menu of your app.
    Go to [Settings > My Account > Delete Account].
  • The stream destinations you set and sources in My Studio will disappear when you delete your account.

How do I change my password?

You can change your password when you logged in Prism Live Studio with an email address.
Go to [Settings > My Account > Change Password].
Enter your current and new passwords to change it.

I forgot my password.

If you log in with email address, you can receive a temporary password.

  • 1. Tap [Forgot your password?] in the login page.
  • 2. Enter your email address used to sign up.
  • 3. A temporary password is sent to the email address you provided.
  • 4. Use the temporary password to log in to PRISM Live Studio.

Errors

I'm having trouble installing the PRISM Live Studio app.

The following cases may cause an error in the app installation process. Please follow the instructions below and try again.

    • Insufficient space on the device

      • Delete unused apps or files to free up space and re-install the app.

    • Temporary error while downloading an app in the app store

      • Reboot the device and re-install the app.

If you still cannot download the PRISM Live Studio app after checking the above, please contact us via Service Inquiry.

I'm having trouble updating to the latest version of the PRISM Live Studio app for iOS.

  • If you're using iOS, the [Open] button may appear instead of [Update] button in the App Store even though you don't have the latest version of your app.
  • Please follow the instructions below to fix this issue.
    • 1. Delete the PRISM Live Studio app you're currently using.
    • 2. Force shutdown your device and then restart it.
    • 3. Go to the App Store and download the app again.
  • If the same problem still persists, contact us here.

What should I do if I'm having trouble using the PRISM Live Studio app?

Errors may occur while using PRISM Live Studio due to various environment-related issues in network, device, and associated services.
If errors occur while using the service, please check below.

    • A “Network Error” message appears.
    • • You are currently not connected to the network. Please try again after checking mobile cellular data or Wi-Fi is turned on.

    • A “Login Error” message appears.
    • • This may be due to wrong social media information saved on the device or the slow response speed of social media authentication.

    • • Try again in the PRISM Live app after logging in again to the social media app.

    • • Try again after changing the network you are currently using.

    • A “Temporary Error” message appears.
    • • Service use may be restricted depending on the device’s settings, network settings and environment. Please check the following.

    • • Make sure that the current time and time zone setting on your device are set properly for your region.

    • • You may see a temporary error message if you are in a bad network environment.
      Internet access may be restricted by the network you are currently connected to.

    • • Please open your browser to check your internet connection is working and try again.

  • * It is recommended to keep your app up to date so that your app is most reliable with latest features.
  • If the error persists after checking the above, please contact us via Service Inquiry.

Others

How do I change the screen orientation?

It automatically adjusts to the orientation of your device before you stream live or record a video.
Make sure that the orientation lock is turned off if the screen doesn't rotate on your device.

How do I change the language on the PRISM Live Studio app?

PRISM Live Studio currently supports Korean, English, Indonesian, Portuguese, Spanish, Vietnamese, Russian, and Japanese. The default language of the app will be the language your device is currently set to.
You can change the language for the PRISM Live Studio app by changing your device's language settings.

Do you need anything further?

Please tap the link below if you need any further information.

Contact Us here

Install and Start

System Requirements

  • Windows:
    • 1. Minimum specifications
      OS : Windows 10, Windows 11 (64-bit)
      Memory : 8GB RAM
      Graphics Card : NVIDIA GTX 1060 or equivalent
      CPU : Intel Core i3-9100 or i5-7600 and above

    • 2. Recommended specifications for general streams
      OS : Windows 10, Windows 11 (64-bit)
      Memory : 16GB RAM or more
      Graphics Card : NVIDIA RTX 2070 or equivalent
      CPU : Intel Core i5-8500 or higher

    • 3. Recommended specifications for gaming streams
      OS : Windows 10, Windows 11 (64-bit)
      Memory : 32GB RAM or more
      Graphics Card : NVIDIA RTX 3060Ti or equivalent
      CPU : Intel Core i7-9800 or i9-9820 and above

  • macOS :
    • Supports Apple Silicon chips only
      Minimum supported MacOS version : 12.3

Update Information

When there is a new update available, a pop-up with update information will appear when you start the app. It is recommended to always update to the latest version.

To view the update information pop-up again after closing it, click the Help icon on the right sidebar and then click [Check for update].

Set App Language

PRISM Live Studio supports Korean, English, Indonesian, Portuguese, Spanish, and Vietnamese. The default language will be the language your device is set to.

You can select the language during PRISM installation and also change the language after installation via [Settings] > [General] > [Language].

Screen Elements and Basic Features

Main Screen Elements

MKomponen Layar Utama: Menu, Channel information, Start/end Live, Record, Edit scene area, Change scene, Actual live broadcast scence area, Scene area, Source area, Audio Mixer area, Setting resolution, Statistics information, Converting Studio Mode, Chat, Alert, Inquiry, Setting
Main Screen Elements

Change Screen Elements

  • Size Adjustment : The size of the Scene, Source and Audio Mixer areas can be adjusted by dragging the edge of each area.
  • Dock Feature :

    1. The Scene, Source, and Audio Mixer areas can be separated or moved freely on the main screen.

    2. If the screen's aspect ratio is vertical, all windows can be arranged to the left for a larger screen.

  • Separate and Attach Window :

    1. The Scene, Source, and Audio Mixer areas can be separated or moved freely on the main screen.

    2. Click the Show More button in the Scene, Source, and Audio Mixer areas, and select the Detach/Attach menu.

    3. If you overlap multiple windows, you can switch between them using tabs in the same dock.

How do I use Studio Mode?

  • About Studio Mode :
    Using Studio Mode, you can prepare a source in the edited scene on the left. Changes in the edited scene are not displayed to viewers until the Change Scene [→] button is clicked.
  • How to apply Studio Mode :
    You can turn on/off Studio Mode by clicking the Convert to Studio Mode button in the sidebar on the right. After finishing editing in the Edit screen on the left, click the Change Scene [→] button in the middle to reflect the changes in the stream screen on the right.
    The Change Scene effects can be set by using Change Scene menu at the top of the scene list area.
    For reference, the effects set by using the Change Scene button are basically applied to all scenes. To set the effects for individual scenes, right-click each scene and click [Apply This Conversion First].

Prepare Channel and Configure Settings for Simultaneous Transmission

Understanding Platforms and Channels

In PRISM Live Studio, you can live stream by connecting to a live platform, such as Twitch and YouTube.

A “platform” refers to this live service. To stream, you'll need to go through a process to connect to a platform. You have two options for connecting to a live platform. The connection method you select can be limited depending on the live platform policy.

  • 1. Service Link : This is a method to connect to a platform by entering the platform account information. Account information entered in PRISM is saved through encryption. When a user logs out from PRISM, the platform account information is reset.
    Service Link
  • 2. RTMP Link : This is a method of connection that involves entering the stream URL and stream key information provided by a platform. If a platform does not support account linking, you can stream by entering the RTMP information. When transmitting a stream via an RTMP link, you cannot see the viewer count and chat information.
    RTMP Link

A channel refers to a location where a stream is posted within each platform. A list of channels linked to PRISM Live Studio is displayed at the top of the main screen. If there are a large number of channels, a horizontal scroll feature is provided.

Add Service-linked Channel

  • 1. Place the mouse cursor on the platform icon at the top of the main screen to display the plus button. Click the button to proceed with service linkage.
    Add Service-linked Channel
  • 2. When you complete the link by entering platform login information, channel information of the platform will be automatically displayed.

Add RTMP-linked Channel

  • 1. Click the '+ Custom RTMP' button at the top of the main screen.
    Add RTMP-linked Channel
  • 2. You can select a platform to link from the URL drop-down menu or by directly entering it.
    You can choose to you can directly enter the URL of the platform you want to link.
    PRISM Live Studio currently supports a total of 5 streaming protocols : RTMP, HLS (YouTube), WHIP (Twitch), SRT, and RIST.
  • 3. Proceed with the link by entering the stream key and channel name provided by the platform.
  • 4. After entering the information, click 'Save'.

Is it possible to stream on multiple video platforms simultaneously?

You can simultaneously stream to as many as six platforms through a simple setting in PRISM Live Studio.

  • 1. First, add the channel(s) you'll use for your stream to the screen through service link or RTMP link.
  • 2. Place the mouse cursor over the icon of the added channel and click the Switch button to 'On'.
  • 3. Change the mode of all transmission channels to 'On'. You can select up to six channels at once.
  • 4. Click [Go Live] and check the stream information in each channel.
  • 5. After checking the information, click [Go Live] button to start simultaneous stream transmission.

Prepare Scene and Source

Add Scene

  • 1. Add a Scene : You can add a scene by clicking the [+] button in the Scene Edit area.
    To start a live stream or record, you'll need a scene that includes at least one source.
    You can check up to ten scenes through real-time thumbnails in the scene list area. You can proceed with scene change even if you are not using Studio Mode.

  • 2. Save a Scene : You can save a scene and a source for later use.
    Click [Menu] > [List of Scenes] > [Export], and enter the save location and file name to create a json or psc file.
    In the Scene Dock area, click [Show more], then select [Export List of Scenes]. Enter the save location and file name to create a json or psc file.
    If you save as a json file, you can take this file to another live streaming program for immediate use.
    If you save as a psc file, you can click the file to start PRISM Live Studio.
    Save a Scene

    If a scene and a source are not saved separately, the scene and source that were set last will stay.

Configure Change Scene Settings

  • 1. How to Change Scenes
    • 1) While Studio Mode is on, click the Change Scene [→] button in between the scenes on both sides to change the mode of the scene in the Edit screen to Live.
    • 2) You can change scenes swiftly by setting a shortcut key. To use the shortcut key, refer to [Configure Shortcut Key Settings].
    • 3) Check the [Change scene when double-clicked] option via [Settings] > [General] > [Studio Mode] to change a scene by double-clicking.

  • 2. Set Basic Effects for Scene Changing
    Click the Change button in the Scene area to display a pop-up to configure settings for scene change.

  • 3. Set Additional Effects for Scene Changing
    After clicking the Change Scene button, click [+] in the pop-up to select from a wider range of effects (push, slide, stinger, fade in specific color, erase luma).
    You can pre-check the scene change effect by using [Preview Transition] in the Attributes pop-up. The detailed settings for each effect can be configured in the Attributes pop-up.

  • 4. Scene Collection Management
    The [Scene Collection Management] feature allows you to manage various scenes or screen layouts.
    Through this, you can create, export, import, and manage List of Scenes.

Add Source

  • 1. Video Capture Device Source
    A built-in camera or an external camera device can be used for your stream.
    For some video capture devices, you'll need to install a driver to start the devices. Before connecting a device, check the updated driver in the official website.
    Refer to the official PRISM Live Studio blog for directions on how to connect video capture devices as the connection methods vary by product.

    The connection method for general camera devices is as follows :
    • 1) First, connect the webcam to your computer.
    • 2) Click the Add Source button.
    • 3) Select [Video Capture Device] from the list > check [New] > click [OK].
      To add the same camera device to two or more scenes, you'll need to select the device from the list by using the [Add Existing] option.
    • 4) Select a camera device from the Properties pop-up > device drop-down list.
    • 5) You can also add the audio of the selected device by checking the [Use custom audio device] option.
    • 6) Click [Filters] to add Effect and Audio/Video filters.
      You can adjust the video screen color using color filters or set filters such as chroma key frequently used in game streams. For detailed settings, see [Useful Features While Streaming].

  • 2. Audio Input Capture Source
    A built-in microphone or an external audio capture device can be used for your stream.
    After clicking the Add Source button, select [Audio Input Capture]. Then, select an audio device from the device drop-down list in the Attributes pop-up. Click [Filters] to use various audio filters.

    You can adjust the stream sound by using a variety of audio interfaces.
    You'll need to install a driver to use some interfaces. Before connecting a device, check the updated driver in the official website.

    How to Connect Audio Interface :
    • 1) Connect an audio interface to the microphone.
    • 2) Connect the USB cable of audio interface to your PC.
    • 3) Click the Add Source button, and select [Audio Input Capture].
    • 4) Go to Computer System Settings > Sound Settings > Input and Output Devices, and set both the output and input devices to the audio interface.
    • 5) Refer to the official websites of each interface as the methods of using interfaces vary by product.

  • 3. Audio Output Capture Source
    You can use audio output produced from the sound card.

  • 4. Application Audio Capture (Beta) Source
    You can capture and use the audio output of a specific running program. This is a useful way to separate audio from a specific program and include it in your live stream.

  • 5. Game Capture Source
    You can capture a game screen in real-time and add it to your stream screen.
    • 1) Capture any fullscreen application : This is a method to automatically capture a full-screen window. After selecting this method, place the mouse cursor focus on the game to start capturing.
    • 2) Capture specific window: This is a method to capture a selected window. When you restart the game, it is captured automatically if there is a widow with the same title.
    • 3) Capture foreground window with hotkey : After adding a source, go to [Settings] > [Hotkeys] > [Game Capture] > [Capture foreground window] to set a hotkey. When you place the mouse focus on the game and click the hotkey, the game is automatically captured.

  • 6. Display Capture Source
    You can add a real-time full-screen display through the Display Capture source. This is useful when you want to share the entire display, including open windows and programs.

    Display Capture method:
    • 1) Automatic : Automatically selects the most suitable method based on the user's system version and graphics card.
    • 2) DXGI Desktop Duplication : Captures the display using DX11.
    • 3) Windows 10 (1903 and up): Captures the display using WGC.

  • 7. Display Capture (Part) source
    Similar to the Display Capture Source, you can capture a specific area of the display. It is ideal when you want to focus on specific content or programs, as you can specify the area you want to capture.

  • 8. Windows Capture Source
    You can capture a screen and add it to the stream screen by designating a specific window of a program that is currently running.

    Capture method :
    • 1) Automatic
      Automatically sets the Windows capture method according to your PC specifications.
    • 2) BitBit (Windows 7 and up)
      We recommend using this method if the Windows version is 1903 or lower. UWP windows (e.g. MS Office, Chrome) cannot be captured using this method.
    • 3) Windows10 (1903 and up)
      We recommend using this method to capture MS Office and Chrome windows. Windows must be updated to version 1903 or higher to use this method.

    Window Matching Priority :
    You have three options to choose from as the standard for recognizing a window for automatic connection to a source.
    • 1) Window title must match : The source is recognized only when there is a window with the same title. This is an option recommended by PRISM Live Studio.
    • 2) Match title, otherwise find window of same type : If there is no window with the same title, connect a similar window based on the class name in Window Attributes.
    • 3) Match title, otherwise find window of same executable : If there is no window with the same title, connect another window that is in the same process.

    Client Area : Only the client area of the window is captured, not the title bar area. (Windows 10 1903 and up)
    Force SDR : Captures images in SDR format even if HDR format capture is supported. (Windows 10 and up)

  • 9. Browser Source
    You can add real-time content from web pages to your stream screen.
    • 1) Enter the address of the live chat window or widget in the URL input field to add the chat window or donation widget to the stream screen.
    • 2) Enter CSS code in the Web Source Attributes window to apply desired styling.
    • 3) Shutdown source when not visible : When this option is activated, the source will be hidden or the web page will be deactivated when switching to another scene.
    • 4) Refresh browser when scene becomes active : When this option is activated, the web page will refresh when switching scenes.

  • 10. Media Source
    You can use media files such as videos, images, or audio clips in your live stream.

  • 11. Image Source
    You can add various image files (JPG, PNG, GIF) saved in the device to your stream screen.

  • 12. Image Slide Show Source
    You can add an image slide show to your stream screen and automatically or manually control the slide show.
    Manual Control Method : After adding a source, designate the Image Slide Show hotkey via [Settings] > [Hotkeys], so that you can control the slide show using the hotkey.

  • 13. Color Source
    You can decorate a scene by applying color to your stream screen.

  • 14. Text (GDI+) Source
    You can display a notice or other sentences on your stream screen by adding text to the screen.
    Select Text Source and enter text directly or load a sentence from a text file.

  • 15. Scene Source
    You can combine the existing scenes and sources of the scenes, and apply them as a new source.

  • 16. Group Source
    You can combine several sources and manage them as a group.
    Click the [Add Source] button and select [Group]. You can add a source to the group by drag-and-drop.

  • 17. Syphon Client Source (macOS)
    You can capture a game screen in real-time and add it to your stream screen.

  • 18. macOS Screen Capture Source (macOS)
    You can select a specific window or program from the monitor or currently running programs and capture only the selected screen to add it in real-time to your stream screen.

Add PRISM Source

  • 1. PRISM Lens Source
    PRISM Lens provides virtual background and beauty features, and you'll need to install PRISM Lens first to use it.

    Note :
    For the Windows version, you'll need to select the audio device to capture audio in the PRISM Lens source,
    For the macOS version, you'll need to add [Audio Input Capture] source to capture audio in the PRISM Lens source.
    For more detailed information, please refer to the PRISM Lens Help page.

  • 2. PRISM Mobile Source
    PRISM Lens provides mobile device link feature, and you'll need to install PRISM Lens first to use it.
    Connect the PRISM Mobile app camera in PRISM Lens to use it as a webcam source on your PC.
    You can easily connect your PC and mobile device using the same WiFi and scan the QR code for mobile device link.
    For detailed information regarding PRISM Mobile Source, please refer to the PRISM Lens Help page.

  • 3. Text Template Source
    You can easily select and add text templates of various designs with motion.
    In properties, you can configure options such as your preferred font, size, color, and more.

  • 4. PRISM Chat Source
    You can add the chat source of the currently streaming platform to your stream screen.
    However, BAND and Custom RTMP do not support PRISM Chat Source.

  • 5. Viewer Count Widget Source
    You can add the number of viewers by platform to your stream screen.
    The widget shows how many people are watching the stream, allowing interaction with viewers.

  • 6. PRISM Sticker Source
    You can decorate your stream screen with various PRISM stickers.
    Select the PRISM Sticker menu from the sidebar and add your desired stickers.

  • 7. GIPHY Sticker Source
    You can decorate your stream screen with various free stickers.
    Select the GIPHY Sticker menu from the sidebar and add your desired stickers.

  • 8. Music Playlist Source
    With the Music Playlist source, you can create playlists with music stored on your PC or free music provided by PRISM Live Studio.
    The free music provided by PRISM Live Studio is sourced from musicians with direct contracts or purchased licenses, allowing you to use them freely for streaming and recording without copyright concerns.
    Note that downloading music files is not supported. you can only use them within PRISM Live Studio.

  • 9. Audio Visualizer Source
    You can add audio visualizer sources designed in PRISM style.

  • 10. Background Template Source
    You can add various images with motion as background image sources.

  • 11. Clock Widget Source
    You can add clock and timer widgets designed in PRISM style to your stream screen.

Add Filter

Right-click on a source to add various Effects and Audio/Video filters.

  • 1. The filters that can be applied by source type are divided into two types.
    Effect Filters : Image source, image slide show source, monitor source, window source, game source, color plate source, text source
    Audio/Video Filters : Video Capture Device Source, Audio Input Capture Source, Audio Output Capture Source, Media Source, Browser Source

    • 2. Description of Effect Filters
    • 1) Apply LUT : This feature allows to easily change the color and tone of videos and images.
      Similar to color filter effects used in camera apps, it provides presets created by PRISM Live Studio.
    • 2) Chroma Key : This is a feature to set a specific part of a screen to appear transparent as if the part has been cut out. Use this feature together with green screen to erase the background, leaving only the human figure in the camera screen.
    • 3) Color Correction : This is a feature to finely adjust the color and tone of an image. Using this feature, you can adjust the gamma, contrast, brightness, etc.
    • 4) Color Key : This is a feature to set a specific part of a colored image to appear transparent as if only the part has been cut out.
    • 5) Crop/Pad : This feature is used to cut out or fill margins at the top/bottom and on either side of an image. Use this feature to cut out the black margins on the left and right side of a camera source.
    • 6) HDR Tone Mapping (Override) : You can manually adjust and redefine tone mapping settings for High Dynamic Range (HDR) content in the video stream.
      This feature, applied to HDR content, provides the ability to accurately map the dynamic range of the video to display capabilities.
      Adjusting tone mapping settings can enhance the visual experience for viewers.
    • 7) Image Mask/Blend : This is a feature to mix images or figures you want on top of a source. Use this feature to apply the masking effect, which is to cut out a source in the shape of a figure, or the blending effect, which is to blend images.
    • 8) Luma Key : This is a feature to set a part of a screen where a specific brightness is applied to appear transparent.
    • 9) Render Delay : This feature allows you to set the rendering delay for videos (0~500ms).
      Use this feature to adjust video/audio synchronization when video and audio outputs are simultaneously produced, such as on an image, game or media source.
    • 10) Scaling/Aspect Ratio : This is a feature to adjust the resolution or ratio of an image. It is useful when you wish to scale up a low resolution image or game.
    • 11) Scroll : This is a feature to apply horizontal and vertical scroll effects to a source. Use this feature to apply a moving effect to a text source.
    • 12) Sharpen : This feature is used when you want to make a video or image clearer.

    • 3. Description of Audio/Video Filters
    • 1) 3-Band Equalizer : An audio processing tool that allows you to adjust and control the balance of audio frequencies in three different bands - low, mid, and high. This tool enables you to modify the sound characteristics of the original audio, tailoring it to the desired audio quality and clarity.
    • 2) Compressor : This is an effect to evenly adjust the overall volume range by compressing signals higher than a set level. It is a useful feature for preventing the generation of sudden loud sound from the microphone.
    • 3) Expander : This produces an opposite effect from that of an audio compressor.
      This is a useful feature for reducing background sound, such as the noise generated by your computer, mouse, keyboard and breathing sounds as well as unwanted voices.
    • 4) Gain : This is a feature to compensate for the audio level reduced by compressor.
    • 5) Invert Polarity : This is a feature to minimize sound quality deterioration caused by phase cancellation when you use two or more microphones.
    • 6) Limiter : The limiter restricts the audio source output from exceeding preset levels, preventing distortion and clipping.
    • 7) Noise Gate : This is a feature to eliminate background noise, such as computer-generated noise, mouse and keyboard clicks, breathing sounds, and unwanted voices.
    • 8) Noise Suppression : This helps reduce or eliminate background noise and unwanted sound artifacts from the audio source.
    • 9) Soundtouch Filter : This is a feature to change the tempo and pitch of audio recordings, providing flexibility in audio manipulation.
    • 10) Upward Compressor : This audio processing tool enhances lower audio components, improving overall dynamic range and clarity of the sound.
    • 11) VST 2.x Plug-in : You can use various audio filters by installing VST plug-in.
    • 12) Video Delay (Async) : This is a feature to delay the video source.

Configure Video Output Settings

Set Resolution and FPS

  • 1. Resolution : This means the clarity (i.e. picture quality) of an image. When the resolution is set high, it can put a heavy load on your PC. Thus, select a resolution by considering the specifications of your computer and stream content.
  • 2. FPS : This means how many frames that configure an image are displayed per second. A higher FPS (60 or more) allows your streams to be smoother and more natural. However, if the specifications of your computer are low, it can make it harder to stream smoothly. Thus, please consider your PC's specifications when making your selection.

You can set the resolution/FPS of your stream via [Settings] > [Video].

Configure Output Settings by Stream Platform

For the output mode of output settings, you can use a recommended value or use Simple Mode.
To use Advanced Mode, configure settings according to the recommended settings for each platform.

If you cannot find the hardware (AMD) from the encoder list, update the driver to the latest version.

YouTube Recommended Settings

- AV1 and H.265

YouTube Recommended Settings
Settings Option
Encoder AV1 and H.265
Resolution/FPS 4K/2160p*60fps 4K/2160p*30fps 1440p*60fps 1440p*30fps
Resolution 3840*2160p 3840*2160p 2560*1440 2560*1440
Bitrate 10,000~40,000Kbps 8,000~35,000Kbps 6,000~30,000Kbps 5,000~25,000Kbps
Data Rate Control CBR
Keyframe Interval 2 s recommended; do not exceed 4 s
YouTube Recommended Settings
Settings Option
Encoder AV1 and H.265
Resolution/FPS 1080p*60fps 1080p 720p*60fps 240p~720p
Resolution 1920*1080 1920*1080 1280*720 -
Bitrate 4,000~10,000Kbps 3,000~8,000Kbps 3,000~8,000Kbps 3,000~8,000Kbps
Data Rate Control Option
Keyframe Interval 2 s recommended; do not exceed 4 s

- H.264

YouTube Recommended Settings
Settings Option
Encoder H.264
Resolution/FPS 4K/2160p*60fps 4K/2160p*30fps 1440p*60fps 1440p*30fps
Resolution 3840*2160p 3840*2160p 2560*1440 2560*1440
Bitrate 35,000Kbps 30,000Kbps 24,000Kbps 15,000Kbps
Data Rate Control CBR
Keyframe Interval 2 s recommended; do not exceed 4 s
YouTube Recommended Settings
Settings Option
Encoder H.264
Resolution/FPS 1080p*60fps 1080p 720p*60fps 240p~720p
Resolution 1920*1080 1920*1080 1280*720 -
Bitrate 12,000Kbps 10,000Kbps 8,000Kbps 4,000Kbps
Data Rate Control CBR
Keyframe Interval 2 s recommended; do not exceed 4 s

Twitch Recommended Settings

Twitch Recommended Settings
Settings Option
Encoder NVIDIA NVENC
Resolution/FPS 1080p*60fps 900p*60fps 720p*60fps 720p*30fps
Resolution 1920*1080 1600*900 1280*720 1280*720
Bitrate 6000 kbps 6000 kbps 4500 kbps 3000 kbps
Data Rate Control CBR CBR CBR CBR
Keyframe Interval 2s 2s 2s 2s
Max. B-frame 2 2 2 2
Twitch Recommended Settings
Settings Option
Encoder x264
Resolution/FPS 1080p*60fps 900p*60fps 720p*60fps 720p*30fps
Resolution 1920*1080 1600*900 1280*720 1280*720
Bitrate 6000 kbps 6000 kbps 4500 kbps 3000 kbps
Data Rate Control CBR CBR CBR CBR
Keyframe Interval 2s 2s 2s 2s


You can also quickly set this by using the Output setting guide for platform provided by PRISM Live Studio.

Output setting guide

Configure Audio Settings

About Audio Mixer

Audio Mixer

The Audio Mixer comprises three colors: green, yellow and red.

  • 1. Green : Recommended to keep the music or game sound within this zone.
  • 2. Yellow : Recommended to keep the microphone sound within this zone.
  • 3. Red : Recommended to keep the sound transmitted from your stream away from this zone.
  • 4. Volume Control : You can control the volume of sound by adjusting control bars below each audio source.
  • 5. Mute : You can turn this feature on/off by clicking the sound icon.

Configure Audio Monitoring Settings

You can check the audio to be transmitted from your stream via [Audio Mixer] > [Settings] > [Advanced Audio Settings].

When the audio monitoring feature is activated, echo or howling can be generated. Echo or howling can occur when the sound coming from a speaker flows into the microphone or audio input and output are repeated in the desktop computer audio system.

When this occurs, adjust the settings in the following method.

  • 1. Keep the sound from flowing into the microphone by using a headset, etc.
  • 2. Change the monitoring device via [Settings] > [Audio] > [Advanced] and try it again.

Delay Audio and Adjust Sync

If audio delay occurs or audio is not synchronized, use the Sync Offset feature in Advanced Audio Settings. For reference, the sync offset unit is in 'ms'. (1000ms=1s)

Configure Audio Settings

You can configure audio-related settings via [Settings] > [Audio].

  • 1. Sample Rate : Sample rate determines the quality of sound transmitted from your stream. In general, 44.1 kHz (sound quality for CDs) is recommended. 48 kHz is for professional streams that require enriched sound.
    • 2. Channel :
    • - Mono : This is a method of sound reproduction using one channel.
    • - Stereo : This is a method of sound reproduction using two or more independent audio channels through symmetrical speaker composition.
    • - Surround Sound : To apply surround sound, check if the input and playback features for this effect are supported in the corresponding service. PRISM Live Studio audio filters support surround sound. However, VST plug-in support is not guaranteed.

Start Live Stream

Select Channel

Before starting a stream, you'll need to decide which channel you'll stream on.
You can select a channel by switching the toggle button of the channel icon at the top of the main screen to On.

Edit Live Info

For a channel that has been added via an account link, you can set the title, category and range of opening of your stream in the 'Live Info' pop-up.

Click the 'Live Info' button of the channel icon at the top of the main screen to edit the live stream information. You can edit the information not only before, but also during a stream.

Start Live Stream

When the channel settings are complete, click [Go Live] to start your live stream.

Share via Social Media

PRISM Live Studio provides a feature to share the links to your streams via social media.

For service-linked channels, place the mouse cursor over the channel at the top of the main screen and click the third button to share via Facebook or X.

Ending Your Stream

Once you start live streaming, the [Finish] button will be exposed on the bottom right side of the screen on your application. Clicking the [Finish] button will end your live stream.

Even if the live stream appears to have ended on the content viewing platform during live streaming, the PRISM Live Studio may continue the transmission according to the RTMP policy of individual platforms. Therefore, in order to safely end the live stream, make sure you click the [Finish] button.

Chat

Is it possible to see the platform chat in one place while streaming to multiple platforms simultaneously?

PRISM integrated chat feature is provided if two or more of the simultaneous transmission channels are account-linked channels. You can write a comment and send it directly to the chat window.

On YouTube, you can delete your comment by placing the mouse cursor over the comment and clicking the Delete button.

Chatting by Platform

You can communicate with viewers in real time by opening a chat window in the right sidebar.

Chatting tabs are individually provided for the account-linked channels. You can use the emoji, comment, report and setting features provided in each platform.

On YouTube-linked channels, if you select scheduled stream from the Live Info window, a chatting room for the scheduled stream opens. The chat room cannot be displayed for BAND and Custom RTMP channels.

PRISM Chat Source

You can add the chat source of the current platform to the stream screen.

However, BAND and Custom RTMP do not support PRISM Chat Source.

Useful Features While Streaming

Using Drawing Mode

1. You can directly draw on the screen by activating the Drawing Mode button on the sidebar.

2. Customize the brush's size and color or use various shapes to decorate the screen.

Configure Replay Buffer Settings

Using a shortcut key, you can save or stream a highlight scene.

  • How to Configure Reply Buffer Settings :
  • 1. Activate the Replay Buffer option via [Settings] > [Output] > [Advanced] > [Replay Buffer].
  • 2. Configure shortcut key settings via [Settings] > [Hotkeys] > [Replay Buffer].
  • 3. If you click the shortcut key on a scene during live or recorded stream, the highlight scene is saved as a file.
  • 4. To stream a saved highlight file from your stream in real-time, go to [Menu] > [Tools] > [Scripts].

More detailed directions will be updated in the official PRISM blog.

Configure Hotkeys Settings

You can directly designate streaming/recording, scene, audio and source-related shortcut keys via [Settings] > [Hotkeys].

You can control your stream more conveniently by setting the frequently used hotkeys, such as to start/end stream, change scene, display/hide source, activate/deactivate mute, and play/pause source.

Configure Chroma Key Settings

Chroma key is a technique to separate an image from its background by using color differences and synthesizing it in another screen. For an Internet stream, this technique is mainly used to remove the background for a camera so as to help viewers focus on the streamer’s expression and the stream screen.

To apply the chroma key technique, you'll need a monochromatic screen for the background. A green or blue screen is mainly used for the chroma key technique. This is because an image can be clearly separated from its background when the colors are distinctly different.

More detailed directions will be updated in the official PRISM blog.

Configure Recording Settings

Record Live Stream

Click the [Rec] button at the bottom of the main screen to start recording.

You can start recording a stream regardless of the state of the stream being started or ended. Therefore, this feature can be used for rehearsal before a live stream or producing a video for recorded streams.

Configure Recording Settings

  • 1. Basic Settings
    You can configure the replay buffer-related recording and basic recording settings via [Settings] > [Output] > [Recording].
  • 2. Advanced Settings
    You can configure advanced settings, such as for recording storage path, recording format, and recording audio track via [Settings] > [Output] > [Advanced] > [Recording].
  • 3. Recording Pause Button Settings
    If you select the option for 'Recording Quality' other than 'Same as Stream' via [Settings] > [Output] > [Recording], you can use the [Pause Rec] button.
    Or, if you configure the recording video encoder via [Settings] > [Output] > [Advanced] > [Recording], you can use the [Pause Rec] button.

Account-related Inquiries

Change Account

Go to [Settings] > [General] > [My Account] > [Log out] and log in to a new account. When you log out, all settings and account-linked channels are reset.

Delete Account

You can withdraw from PRISM Live Studio service via [Settings] > [General] > [My Account] > [Delete Account].

Once delete the account, the account cannot be recovered.

Reset Password

You can change the password to the account you have created via email.

Go to [Settings] > [General] > [My Account] > [Change Password] and set a new password.

A password must be at least 6 characters but not more than 20 characters, including alphabets, numbers, and special characters.

When Account is Locked

Your account will be locked if you enter an incorrect password continuously in the password input screen.

You can try again in an hour, or click on “Forgot your password??” to reset your password.

Error Inquiries

When App Crashes

When the app crashes, PRISM Live Studio displays the following notification.
"The program crashed due to an error. Visit the official PRISM blog for troubleshooting details."

There can be several reasons for the crash.

  • 1. Crash caused by adding an external plug-in

    Since the stability of the external plug-in cannot be ensured, we recommend deleting the plug-in.

  • 2. Crash caused by a device or device driver

    Check conditions of the camera, microphone, and capture board first before updating their drivers to the latest versions.

  • 3. Crash caused by a graphics card or graphics card driver

    The app may experience stability issues if the minimum graphics card specifications recommended by PRISM Live Studio are not met.
    We recommend updating the graphics card driver to the latest version.

  • 4. Crash caused by system memory shortage

    If there is not enough system memory, we recommend turning off unnecessary programs while using PRISM Live Studio.
    Troubleshooting details will be continually updated on the official PRISM Live Studio blog.
    Check out the details on our blog or contact us via the official PRISM Live Studio email address at prismlive@navercorp.com.

Graphics Card Inquiries

PRISM Live Studio supports DirectX Version 11. If your graphics card does not support DX11, the following notification will be displayed.
"Cannot stream stably in high quality. Please upgrade your graphics card.”

The minimum graphics card requirement of PRISM Live Studio is NVIDIA GTX 960 or equivalent.

If this minimum specification is unmet, the following notification will be displayed.
“Your graphics card does not meet the minimum system requirements supported by PRISM, stability issues may arise.”

We recommend using a graphics card with better performance if possible.

Frame Drop Inquiries

PRISM Live Studio displays a notification when Frame drop occurs.

Refer to the following blog post for troubleshooting details.
https://medium.com/prismlivestudio/pc-guide-guide-for-dropping-frames-83a20050ad34

The Stream Ended

The main causes for automatic stream ending are as follows.

  • 1. Unstable network

    A stream is automatically ended if the network is unstable, resulting in delay or suspension of the stream transmission.

  • 2. Deleted channel or invalid streaming permission

    A stream is automatically ended if the streaming channel is deleted or streaming permission becomes invalid during the stream.

Displayed as Invalid live stream

The 'Invalid live stream' message is displayed when a scheduled stream has been canceled or a stream is transmitted through the channel from another device.

If a scheduled stream has been canceled, select another scheduled stream. If the channel is already streaming, end the stream and try again or select another channel.

Chatting Reaction is Slow

There can be time difference between chatting and live stream depending on the situation of the network or platform.

Chats are Not Displayed

The main causes of this problem are as follows.

  • 1. If streaming via BAND and Custom RTMP channels

    A chat room cannot be displayed for BAND and Custom RTMP channels. Look for messages in the chat room of each platform page.

  • 2. No chat messages

    If there are no chat messages, it can appear as though the chats are not displayed. Please wait for a moment until messages are entered.

Channel is Not Displayed

If the platform has been linked but the channel is not displayed, it could be either of the two cases below.

  • 1. Channel creation and authentication were not completed
    To stream via YouTube, you'll need to complete the channel creation and authentication process once on the YouTube page. After linking your YouTube account, click the [Create a channel] button in the channel list. You will then be redirected to the Create Channel page. When the channel creation and authentication process is completed, it will appear in the channel list.
  • 2. Channel information search failed
    Channel information search can fail due to a temporary error. Refresh the channel list and try searching channel information again.

'Channel Authentication Info Expiration' Message is Displayed

If the storage period of login information in each platform expires, the 'Channel authentication info expiration' message is displayed.

If the notice is displayed prior to a stream, link the platform again according to the instructions provided by the program.

If the notice is displayed during a stream, you can link the platform again after the stream is ended because it does not affect the stream.

YouTube Channel Errors

Please refer to the following if an error occurs while linking to YouTube.

https://medium.com/prismlivestudio/mobile-guide-troubleshooting-connection-errors-for-youtube-6985e98686

Please refer to the following if an error occurs when you start a stream on YouTube.

https://medium.com/prismlivestudio/mobile-guide-troubleshooting-errors-for-live-streaming-on-youtube-a4435d701f02

There's No Sound

  • 1. Check if the microphone is set to 'On' in your device's system settings.
  • 2. If the audio is not muted, check if the correct input and output device have been selected.

    Set the microphone to 'On' in your device's system settings.

    Settings > Privacy > App permissions > Microphone > 'Allow apps to access your microphone' On
    There's No Sound

Sound is Breaking up

This problem can occur when the user device performance, system condition or network quality is not good.

  • 1. Use the Refresh or Reconnect options to temporarily solve the problem.
  • 2. Try converting your wireless network (Wi-Fi) to a wired network.

There's No Video

  • 1. Check if the camera is set to 'On' in your device's system settings.
  • 2. Check if the camera is properly connected.
  • 3. Check if the camera is being blocked by a virus vaccine software.
  • 4. Check if the camera drive is of the latest version.
  • 5. Check if the same source has been added to another scene or program.

Audio is Not Synchronized

  • 1. This problem can occur if the computer specifications are not sufficient for the data processing and transmission capacity. Configure transmission settings as recommended.
  • 2. Check your network state. It is recommended to use a wired network rather than a wireless (Wi-Fi) network.
  • 3. If an external device has been added, this problem can occur due to a difference in data transmission speed between the devices. Adjust the speed via [Advanced Audio Properties] > [Sync Offset].

Problem Still Not Resolved?

If your problem was not resolved with Help, please use the following methods.
To send an inquiry, click the Help icon on the program's sidebar and then click [Contact Us].
Send an inquiry via email at prismlive@naver.com.

Introducing PRISM Lens

What kind of service is PRISM Lens?

The virtual backgrounds, beauty effects, and mobile device connection features of the previous PRISM Live Studio have been improved and released as PRISM Lens.

Use PRISM Lens to use the features above not only in PRISM Live Studio but also in other live streams and video conference apps.

Install and Start

System Requirements

  • Windows:
    • 1. Minimum specifications
      OS : Windows 10, Windows 11 (64-bit)
      Memory : 8GB RAM or more
      Graphics card : GTX1060 or higher
      CPU : i3-9100 or i5-7600 or higher

    • 2. Recommended specifications
      OS : Windows 10, Windows 11 (64-bit)
      Memory : 16GB or more
      Graphics card : RTX2070 or higher
      CPU : Intel Core i5-8500 or higher

  • macOS :
    • Supports Apple Silicon chips only
      Minimum supported MacOS version : 12.3

Update Information

If a new update is available when the app is launched, an update information pop-up will be displayed. We recommend that you always update to the latest version.

Update information can be viewed by clicking the profile image at the bottom of the right sidebar in PRISM Lens and selecting [Program Information] > [Check for Updates].

Screen Elements and Basic Features

Main Screen Elements

Main screen elements: Update Information, PRISM Lens Tabs, Screenshot, Camera Device List, Camera Device Properties, Virtual Background, Beauty Effect, PRISM Mobile, Color Correction, Color Filter, Setting Resolution, Statistics Information, Blur Effect, Prism Discord, Notice, Help, Settings, Program Information, Logout, Exit
Main Screen Elements

Settings for Basic Features

  • 1. PRISM Lens tab

    The PRISM Lens 1, 2, and 3 tabs are each a virtual camera, and you can use up to three virtual cameras simultaneously.

    When PRISM Lens is installed, three virtual cameras (PRISM Lens 1, PRISM Lens 2, PRISM Lens 3) are added.

    The output, device selection, and filter of each Lens can be set independently.

  • 2. Camera device list

    The available camera devices are displayed in the upper right corner of the main screen.

    View the list of all available camera devices and select the camera that you need.

  • 3. Camera device properties
    • - Resolution :
      • Displays the list of resolutions supported by the selected camera.
      • Resolution refers to the image's sharpness (image quality). Select the resolution that you need.
      • * Caution : Higher resolutions require more computer resources and may cause overheating or delays in video transmission. We recommend that you select a resolution that is appropriate for your PC specifications.
    • - FPS :
      • The list of FPS (frames per second) supported by the selected camera.
      • Higher FPS values (above 60) allow you to capture higher-quality images but use more computer resources.
      • * Caution : We recommend that you select an FPS that is appropriate for your PC specifications.
    • - Video Format :
      • The list of video formats supported by the selected camera.
      • * Caution : The video format may vary depending on the selected output resolution. Selecting the H.264 format may cause delays.

Useful Features

  • 1. Virtual Background
    The background surrounding a figure is automatically detected and can be removed or filled with another image.
    Free images and videos provided by PRISM are available in the [PRISM] or [FREE] tab.
    You can also use an image from your PC for the background image in the [MY] tab.
    Use additional settings for virtual backgrounds such as [Edit Image], [Blur Effect], and [Motion On/Off].
    Virtual Background

  • 2. Beauty Effect
    Use the automatic facial detection to retouch parts of the face in webcams only as much as you need. Look more beautiful and natural with beauty effects.
    Three models, Natural, Cute, and Sharp, are provided. The settings can be saved and reused as custom filters.
    • - Adjust eye size and facial details
    • - Skin retouch feature
    Beauty Effect

  • 3. PRISM Mobile Connection
    Use the PRISM mobile app as a webcam for your PC when connected to the same Wi-Fi network.
    • - In PRISM Lens, click the camera device list and select [Connect PRISM Mobile].
    • - Check the QR code on the left preview screen of PRISM Lens.
    • - Install and run the PRISM mobile app, and then scan the QR code in the CONNECT menu of the mobile app.

    When the mobile device is connected, check the connection status and select the output mode (video and audio, video only, audio only).
    * Caution : We recommend that you check if PRISM Lens is enabled in your firewall settings in advance.
    PRISM Mobile Connection

  • 4. Color Correction
    Use the [Color Correction] feature to improve the video's color by adjusting gamma, contrast, and shading.
    View the Preview screen on the left after adjusting the color settings.
    Color Correction

  • 5. Color Filter
    Use a variety of color filters to add more creativity to your live stream and make your videos look more vivid.
    Set the color filter and adjust the density in detail.
    Color Filter

  • 6. Screenshot
    Press the [Screenshot] button to save a screenshot in the specified location. Change the saved location in [Settings].

Settings

Changing Accounts

- Log out by clicking [Settings] > [General] > [PRISM Account] > [Log Out] and log in with another account.

- All previously used settings are reset when you log out.

* Caution : If you are logged in to the PRISM Live Studio app, you will be logged in to the same account automatically when launching PRISM Lens.

Language Settings

PRISM Lens supports English, Indonesian, Korean, Portuguese, Spanish, and Vietnamese.

The app is installed using the PC's default language.
You can also select a language when installing PRISM Lens or change it in [Settings] > [General] > [Language].

Language Settings

Output Resolution

Set the output resolution for each Lens separately in [Settings] > [Output Settings] > [Output Resolution].

Output resolution: The selected resolution is applied to the preview screen and output.

Higher resolutions require more computer resources to run smoothly. We recommend selecting a resolution that is appropriate for your PC specifications and network bandwidth.

Quality Settings

Adjust the quality of the virtual background for each Lens separately in [Settings] > [Output Settings] > [Quality Settings].

Higher-quality settings will improve the quality of your virtual backgrounds. Note that higher-quality settings also require more CPU resources.

Decoding Settings

Select software or hardware decoding in [Settings] > [Output Settings] > [Decoding Settings].

* Caution : Using hardware decoding in Windows improves the performance of PRISM Lens but may reduce stability depending on your environment.

Exiting the App

Exiting the App

For improved usability, clicking [X] in the upper-right corner of the main screen will minimize PRISM Lens to the system tray instead of exiting it.

To fully exit the app, use the following method.

- Click the profile picture at the bottom right and click [Exit] to fully exit the program.

- Right-click the PRISM Lens icon in the system tray and click [Exit] to completely exit the app.

Top of page